
You have the idea.
You may already have the content too, or at least enough to start. What you probably don’t have yet is a live membership site people can join and pay for.
And that’s the part that often feels bigger than it needs to be.
A lot of tutorials make launching a membership site sound like a long, complicated project. But your first version doesn’t need every feature, content category, or possible offer from day one.
The goal is much simpler: build the foundation.
With WishList Member, you can have that done in a weekend.
By Day 2, you should have one membership tier, one piece of gated content, a working payment setup, and a page that explains what people are signing up for.
That may sound small, but it’s enough to launch.
Here’s how to get it done.
Contents
Before You Start: Get These Three Things Ready
If they’re not sorted early, they can slow down the whole weekend.
1. A working WordPress site
You need a WordPress site that’s already installed and running before you start setting up WishList Member.
If you’re starting from scratch, set up your hosting, domain, and WordPress installation before Day 1. Many hosts, including HostGator and SiteGround, offer one-click WordPress installs.
2. The WishList Member plugin
WishList Member is what turns your WordPress site into a membership site. It gives you the tools to create membership levels, protect content, and connect member access to your payment setup.
Choose and purchase a WishList Member plan before you start. Once you’ve purchased it, you’ll get access to the Customer Center, where you can download the plugin and find your license key.
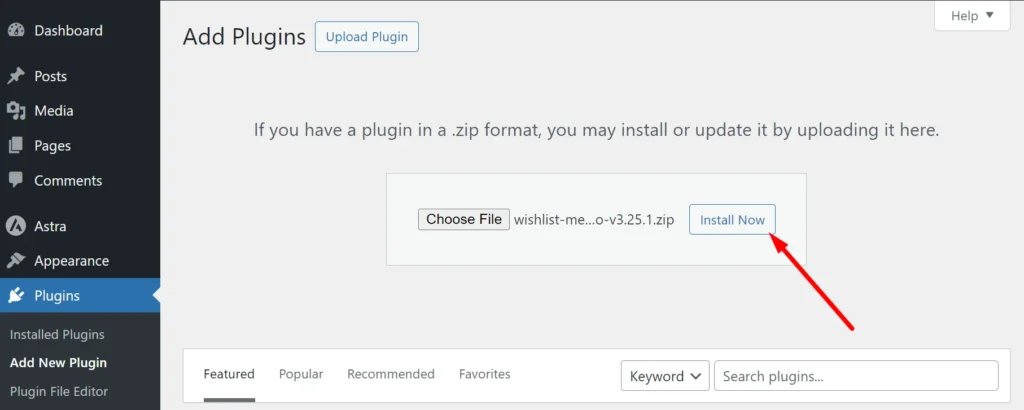
Then, in WordPress, go to Plugins > Add New Plugin > Upload Plugin to install the downloaded ZIP file. Activate the plugin, enter your WishList Member license key, and you’ll be ready to begin the membership setup.
3. A payment gateway account
WishList Member integrates with Stripe, PayPal, and a range of other payment providers.
For many people, Stripe is a straightforward place to start. You’ll need to create your account and complete any required payment and account setup before you can start accepting payments.
Do this before you begin building so you’re not held up by account verification or other setup steps later.
Once all three are in place, you’re ready to build the actual membership setup.
💡 WishList Member Tip: Not sure which plan to start with? The Basic plan supports one membership site and includes unlimited memberships, content protection, Stripe and PayPal integrations, and other core features you need to get started.
What “Launch-Ready” Actually Means
This might be the most important part of the whole guide.
A lot of membership sites never launch because the definition of “done” keeps growing.
First, it’s one more membership level. Then a welcome video. Then a drip course. Then an onboarding email sequence. Then a custom login page.
Before you know it, a simple launch has turned into a project that keeps moving further away.
For your first version, launch-ready comes down to four things that let someone understand your offer, pay, and access what they joined for:
- One membership level: Not three levels. Not a free plan and a paid plan. Just one clear offer.
- One piece of protected content: This could be a PDF, video, course module, private post, template, or any resource members can access after joining.
- A working payment flow: Someone should be able to land on your site, click a button, pay, and get access.
- A simple signup page: Basic copy, your price, what members get, and a way to purchase.
Anything that doesn’t help you complete that basic journey can wait until after launch. That means you’re not building these this weekend:
- Multiple membership levels
- A drip content schedule
- A full online course
- Custom email automation sequences
- A member forum or community space
- A polished brand design
You may add those later. Some of them will become important as your membership grows.
But none of them need to exist before your first member can join.
Day 1: Set Up the Core Membership
Day 1 is about getting the basic membership structure in place.
You only need four things, and it’s best to do them in this order.
1. Create Your Membership Level
In your WordPress dashboard, go to WishList Member > Setup > Levels.
Click the green + button at the top of the screen, enter a name for your membership level, and click Apply. You can keep the name simple, such as Member or Premium Member, or use the actual name of your offer.
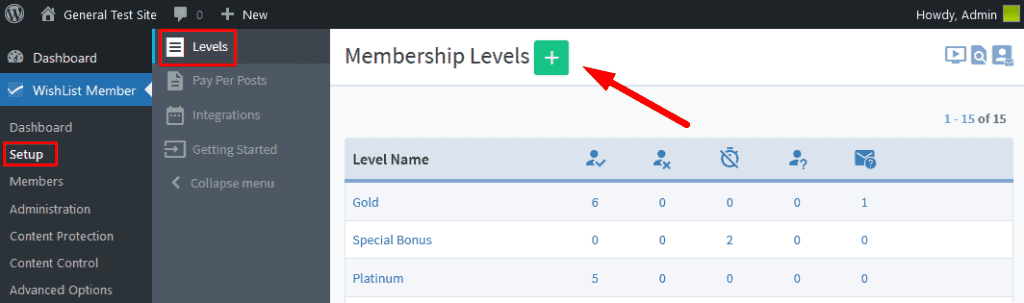
Your membership level determines which members can access the protected content you assign to it. As you continue setting things up, you’ll connect your content and registration options to this level.
Don’t spend too much time trying to make the name perfect. You can always change it later.
2. Protect Your First Piece of Content
Next, choose one page or post you want members to access after joining.
Open it in the WordPress editor and scroll to the WishList Member section below the content area. Set Protection to Protected, then choose the membership level you created under Access and click Apply Settings.
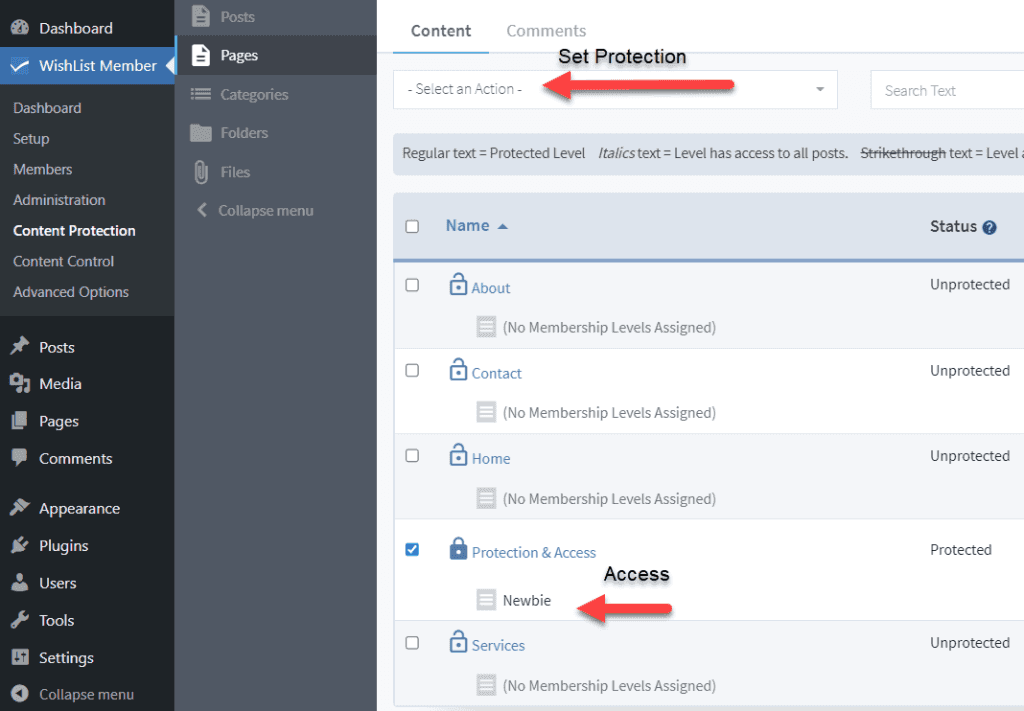
Once you’ve applied those settings, only members with access through that level can view the protected page. If someone without access tries to open it, WishList Member can send them to your Non-Members page instead.
You can customize that page later. For now, the priority is making sure your first members have something valuable waiting for them once they join.
You’re not building a full content library yet. You’re confirming that the access side of your membership works before adding more.
💡 WishList Member Tip: You can protect WordPress pages, posts, and custom post types, including course lessons, video pages, and download pages.
3. Connect Your Payment Gateway
Now go to WishList Member > Setup > Integrations > Payment Providers. This is where you can connect WishList Member with payment providers such as Stripe and PayPal.
Select the provider you want to use, enable the integration, and follow its setup steps to connect your account. Then link your paid offer to the membership level you created earlier so buyers receive the right access after they purchase.
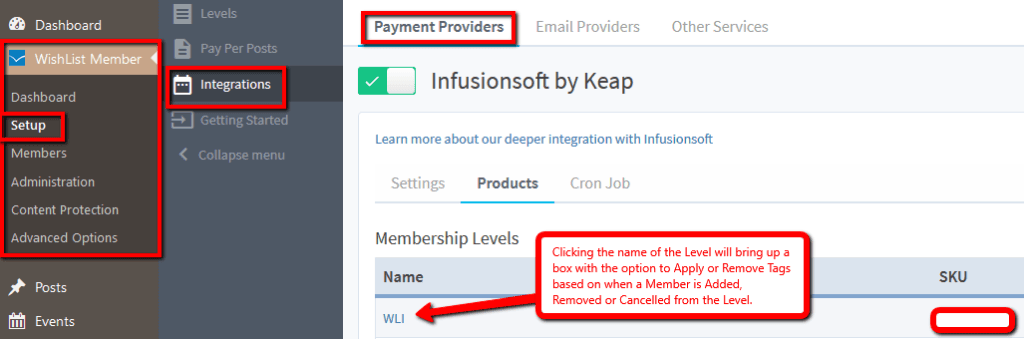
Once the integration is set up, you’ll have a purchase button or link you can add to your sales page. When someone uses it to purchase and register, WishList Member can add them to the corresponding membership level automatically.
For now, focus on getting the payment provider connected and the correct membership level attached to the offer.
4. Check Your Registration and Login Pages
Before moving on, check that new members can complete registration and find their way back into the site afterward.
Go to WishList Member > Setup > Levels, open the membership level you created, and select the Registrations tab. Review the registration settings and make sure they’re appropriate for the people joining this level.
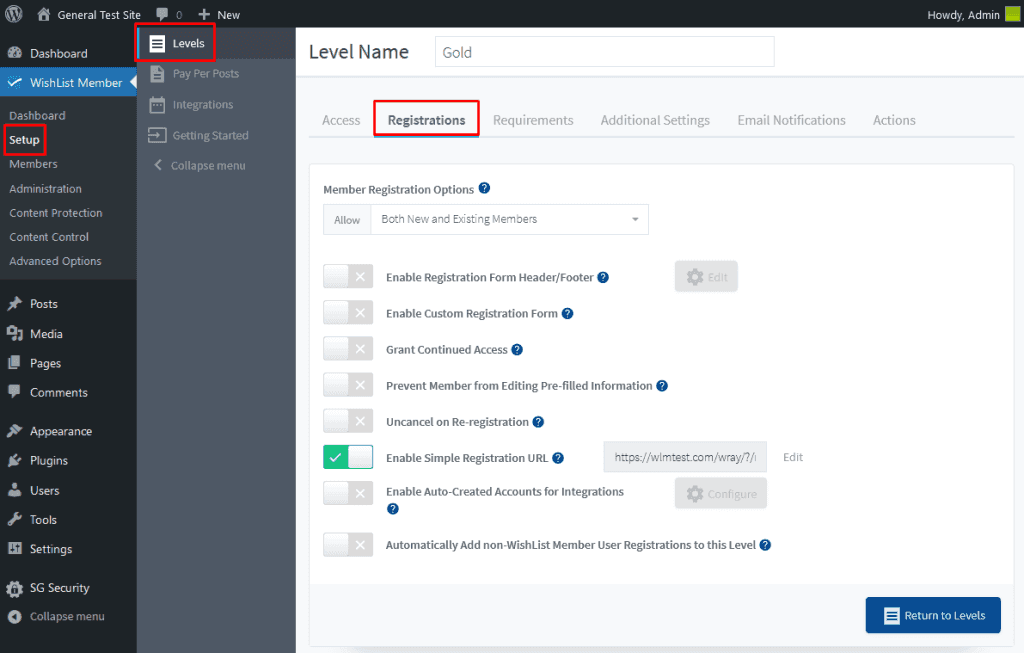
Then make sure members have a clear way to log in when they return. You can use the standard WordPress login or add a WishList Member login form to any page using the [wlm_loginform] mergecode.
Open the registration and login experience as a visitor to see if everything loads properly before you start sending people to the site.
Day 2: Publish, Test, and Share It
Day 1 was about getting the setup working. Day 2 is about making sure people can understand the offer, join without confusion, and actually hear about it.
1. Build a Simple Sales Page
Create a new WordPress page for your membership offer.
This is where you’ll add the purchase button or link from the payment setup you configured on Day 1. It only needs to answer the questions a potential member is already asking:
- What do I get?
- Who is this for?
- How much does it cost?
- How do I join?
Start with a clear headline. Add a short explanation of the membership, a few bullets showing what’s included, the price, and a clear way to purchase.
You don’t need a designer or page builder to get this live.
Clarity matters more than polish. A simple page can do that job well enough for your first launch.
2. Write a Welcome Email
Next, customize the email members receive after they register.
Go to WishList Member > Setup > Levels, open the membership level you created, and select Notifications. Under New Member Registration, click Edit Notifications to edit the email sent to new members.
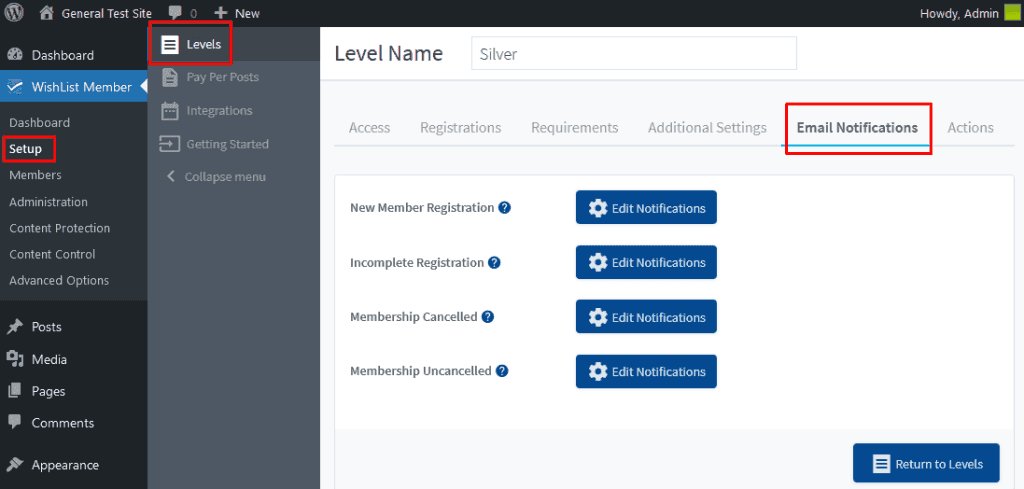
Don’t leave the message sounding like a system notification. Welcome the new member, remind them what they now have access to, and point them to the first thing they should do.
WishList Member can include their login information in this email, so keep those details in place while you personalize the rest of the message.
This should feel like the beginning of their membership.
3. Tell Real People About It
Once your sales page is live, start by sharing it with a small group of people who may genuinely be interested.
Send the link to people in your network who fit the audience for your membership, such as past clients, subscribers, or people who’ve shown interest in the topic before.
Not a mass message. Not a vague “I launched something” post.
Tell them what you built, who it’s for, what it costs, and why you think it may be useful to them.
Your goal for Day 2 is simple: get your first paying member.
Once someone can pay, register, access the protected content, receive the welcome email, and log in again successfully, you know the basic system works. Then you can build from there.
What to Improve After Launch
Once you have paying members, even just a few, you’ll have a much better idea of what deserves your attention next.
Instead of adding features just because they’re available, use what you learn from those early members to decide what will make the experience better.
Here are a few things you might add:
- More protected content: Once your protection setup is working, you can start expanding what members have access to with additional resources.
- A drip schedule: Instead of giving members everything at once, you can release protected content over time using WishList Member’s Content Scheduler.
- Email automation: Connect your email provider to WishList Member so new members can be added to the appropriate list and receive an onboarding sequence.
- Additional membership levels: Create more membership levels when you have a reason to offer different access or membership options.
- Cancellation and upgrade flows: Make it easier for members to cancel or move between membership levels as your membership becomes more established.
Frequently Asked Questions
Ready to Launch Your Membership Site?
Two days is enough to move from “I’m thinking about it” to “my membership site is live and ready to take payments.”
Pick a weekend, block out the time, and work through the steps above in order. By Sunday, the membership site you’ve been thinking about could finally be open for business.
Enjoyed this article? Follow us on Twitter, Facebook, YouTube, and LinkedIn. Plus, get notified about feature updates, upgrades, and more when you subscribe to our newsletter!