An effective membership sales / offer page is important for a number of reasons. This is the main page users will see when deciding if they will join your membership so it needs to be clear and compelling. You can create and customize your membership sales page when using WishList Member.
You are selling your site and providing an offer to those who are interested. Your offer might have a cost (one time or recurring) or it might be free. Either way, you will want a Sales / Offer page for your site.
That being said, the focus of this article is the methods for adding a purchase / registration option to your page.
You will ultimately have a button or link (or multiple buttons and links) on the page. Something along the lines of “Buy Now” or “Join Now” are often used. “Get Started” is another popular option.
If it's a paid offer, it will be a purchase button or link that will start the purchase / registration process.
If it's a free offer, it will be a registration button or link that will start the registration process.
—
Sales Page – Paid Offer
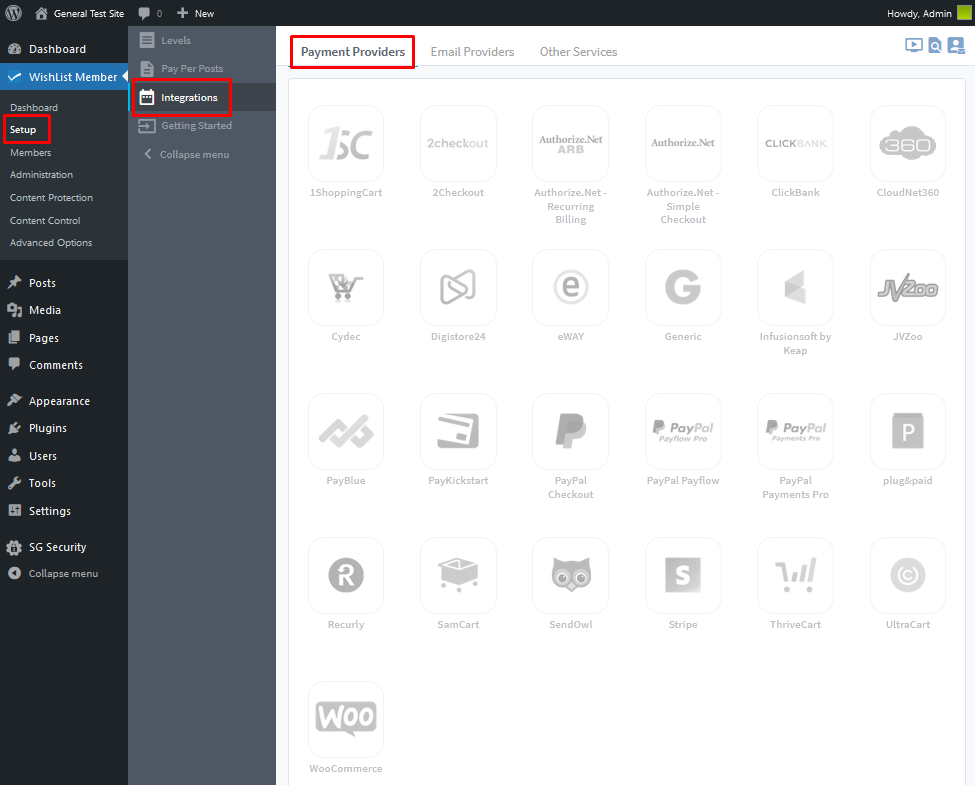
WishList Member includes integrations with a large variety of payment providers.
This means you can integrate a membership level with options like PayPal, WooCommerce, Stripe, ThriveCart and many more. You can then accept payment to allow a user to register.
Integrations can be setup in the Setup > Integrations > Payment Providers section of WishList Member.

(More details on setting up an integration with a specific payment provider is available in the Payment Providers section of the WishList Member Knowledge Base)
—
Once you have integrated your membership level with the payment provider of your choice, you will have a payment button or link.
You can simply insert the payment button / link onto your Sales / Offer page and you're all set.
Anyone who uses that payment button / link to sign up will be a member with the corresponding membership level.
More details on creating a sales page for Paid Users is available right here.
Sales Page – Free Offer
If you are offering a free membership, there are a couple of main options that can be used to allow for registration.
You can use a Registration URL or the Registration shortcode.
In this case, you can insert a button or link on the Sales / Offer page and set it to direct to the Registration URL for the membership level. Anyone who uses that button / link will be sent to a page with a registration form the user can fill out for free.
Or you could insert the Registration shortcode onto a page and that will display the registration form for the membership level. You could then set the button or link on the Sales / Offer page to direct to the page with the Registration shortcode.
Either option will allow the user to register for the membership level for free.
(More details on the two options are available in the Registration URL and Registration shortcode articles in the WishList Member Knowledge Base).
More details on creating a sales page for Free Users is available right here.
—
Setting your Sales / Offer page as your Non-Members page
Something to consider is setting your Sales page as your Non-Members page.
This is an opportunity to offer those who just attempted to access protected content with the option to join the membership. They showed interest in content that is only available to those in the membership level so providing the option for them to join can lead to a new sign up.
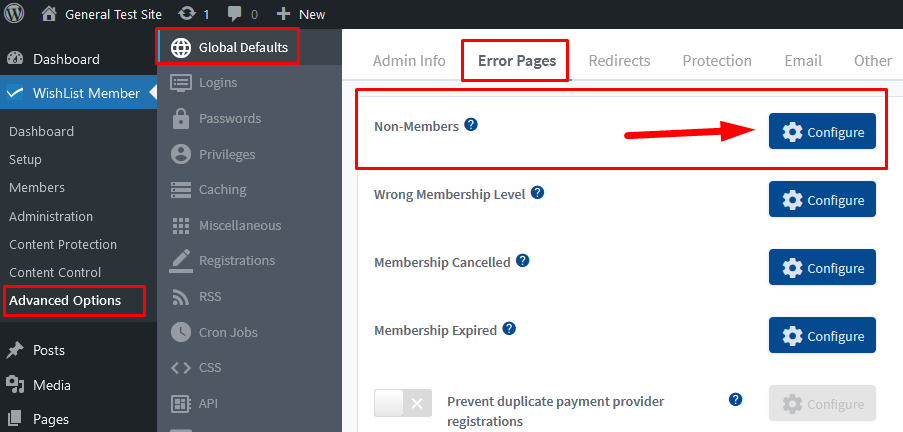
The Non-Members error page will be displayed to Non-Members (users with no membership level assigned to them) if they attempt to access any protected content. It will also be displayed to those who are not logged in if they attempt to access any protected content.
The Non-Members page can be set in the Advanced Options > Global Defaults > Error Pages section of WishList Member. You can click the blue Configure button to set a page.

—
The Configure Error Page for Non-Members popup will appear and you can select your Sales / Offer page from the list.

—
Or, you could include a more generic message on the Non-Members page stating the content is for members only and could simply include a link on the bottom of the page that reads:
“Interesting in seeing more? Click Here to join”
That link could then direct to your Sales / Offer page that includes all the details.
—
WishList Member Quick Start Guide Series
- WishList Member Quick Start Guide
- Installing WishList Member
- WishList Member Dashboard
- WishList Member Setup Wizard
- Membership Success Checklist
- Create a Membership Level
- Create a Welcome Page – After Registration
- Create a Member Dashboard Page – After Login
- Create Membership Content
- Create a Sales / Offer Page
- Member Login Options
- Courses, Quizzes, Points and Badges
- Manage Members
