How can someone sign up and become a member? There are a few methods you can use in WishList Member to allow for member registration and we'll run through those below. You can use one, some, or all of the available options as it will come down to which best fits the needs or preferences of you and your soon-to-be members.
Once they join and become a member, they can access their assigned protected content and enjoy all the benefits of membership.
We've included a brief overview of each registration option below along with a link to more details in a corresponding Knowledge base entry.
Registration URLs
These helpful links are often referred to as “Simple Registration URLs”. As their name suggests, they are a simple to use registration link. There is a unique Simple Registration URL that can be used for each membership level. These Simple Registration URLs automatically direct users to a page displaying a registration form and allow for sign up to that specific membership level. This means anyone who can access the URL can use it to join the membership level.
For those reasons, the Simple Registration URLs are typically used for free membership levels or for testing the registration process.
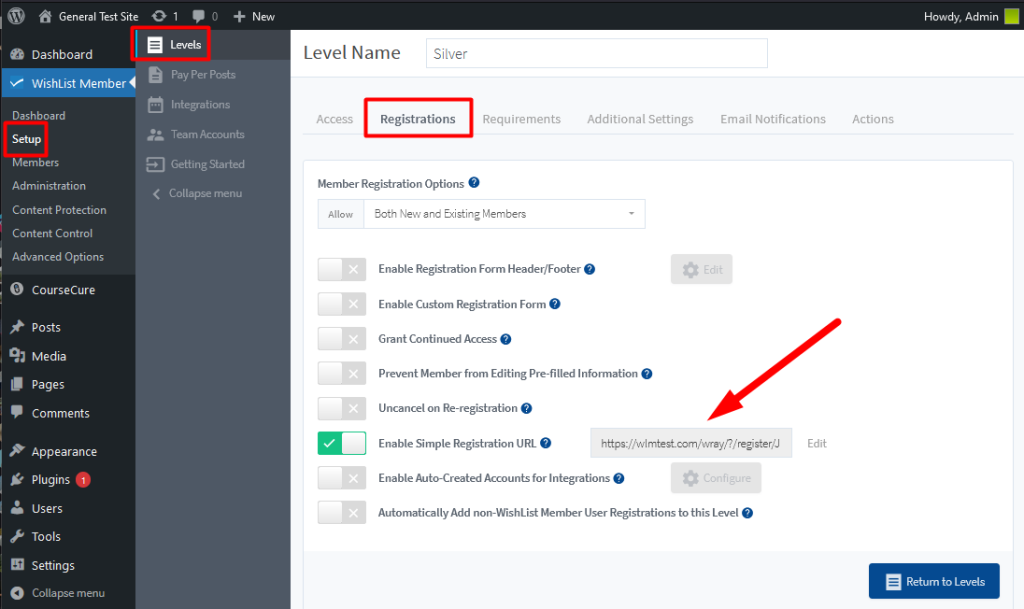
You are able to get a Simple Registration URL in the Setup > Levels > *Click on Level Name* > Registrations section of WishList Member. The screenshot below shows the URL for the Silver membership level.

—
Each Simple Registration URL will display a form similar to the one shown in the screenshot below.

—
Anyone who visits that page can fill in the form and will be registered for the corresponding membership levels.
More Details Can Be Found Here: WishList Member Simple Registration URLs
—
Registration Shortcodes
WishList Member includes a feature you can use to easily insert a registration form into any WordPress page or post. This can be done using a Registration Shortcode and is a very quick process. No coding knowledge or skills required.
This is an example of a Registration Shortcode for a membership level named Silver.
[wlm_register “Silver”]
In this case “Silver” is the name of the membership level and this format works for any membership level. Setting the name of the membership level within the shortcode will create a registration form for that specific membership level.
Adding that shortcode to the content section of a page or post will insert a registration form and allow for sign up.
—
The WishList Member Shortcode Creator can also be used to generate any Registration Shortcode. A few clicks and you have your shortcode created for you.
Keep in mind, the registration forms inserted into a page or post using this method are often used for free membership levels as once this short code is placed on a page or post, anyone who can access that form can register.
More Details Can Be Found Here: Registration Form Shortcode – Add Registration Form to a Page or Post
—
Paid Member Registration / Payment Provider Integrations
The options mentioned above are most commonly used for free registrations or simple integration methods. If you want to charge a price to allow for member registration, WishList Member includes a variety of online Payment Providers located in the Setup > Integrations > Payment Providers section. Any integration options in this section are known as Full Integrations.

—
Below is a list of the WishList Member full integration options for payment providers with links to corresponding Knowledge base entries.
(In alphabetical order)
- 1ShoppingCart
- 2Checkout
- Authorize.net Recurring Billing
- Authorize.net Simple Checkout
- ClickBank
- CloudNet360
- Cydec
- Digistore24
- eWAY
- Infusionsoft by Keap
- JVZoo
- PayBlue
- PayKickstart
- PayPal Checkout
- PayPal Payflow
- PayPal Payments Pro
- plug&paid
- Recurly
- SamCart
- SendOwl
- Stripe
- ThriveCart
- UltraCart
- WooCommerce
—
More Details Can Be Found Here: WishList Member Integrations – Payment Providers
Create a Sales Page for Free Registrations or Paid Registrations
The above registration options can be used to allow anyone who is interested to fill out a registration form and become members on your site. You can use those options along with a Sales page (for Paid users) or Registration page (for Free users) to bring in new members.
More Details Can Be Found Here: Create a Membership Registration Page for FREE Users
More Details Can Be Found Here: Create a Membership Sales Page for PAID Users
