WishList Member includes an integration with PayPal Checkout. You can set users to be added to a membership level, a Pay Per Post, a Course, or a Team Plan in WishList Member if they purchase through a PayPal generated payment button or payment link. This means you can automatically set users to gain access to protected content as soon as they make their purchase.
More details are explained below (including a Video Tutorial).
Enable PayPal Checkout Integration
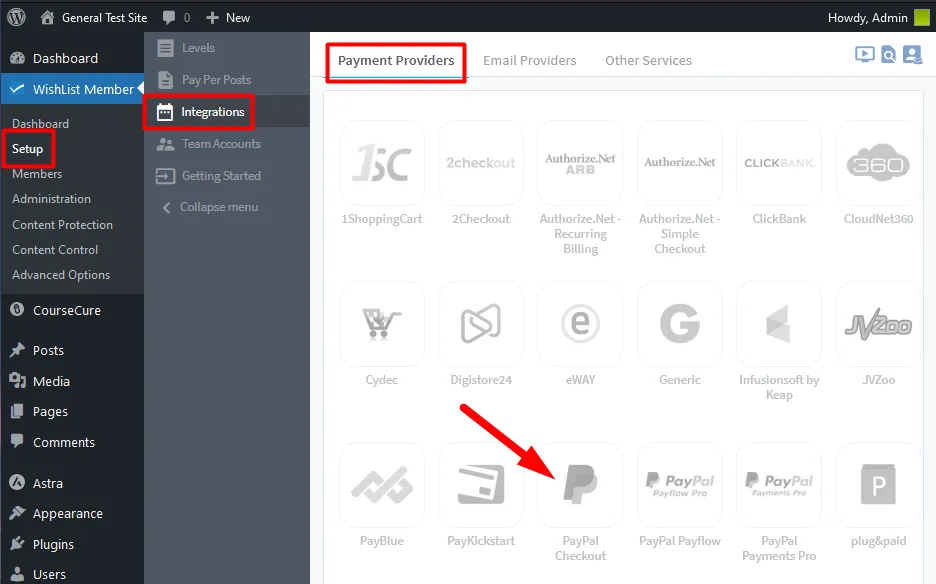
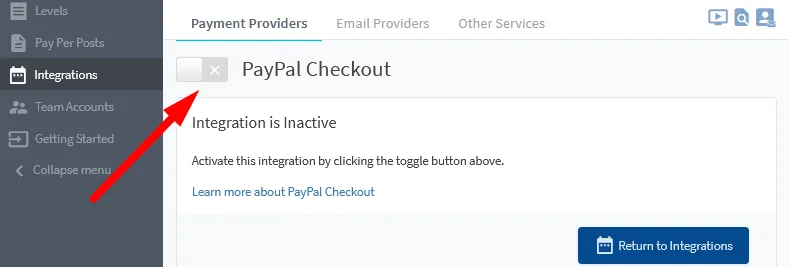
First, you can select and enable the PayPal Checkout option in the Setup > Integrations > Payment Providers section of WishList Member.
—
—
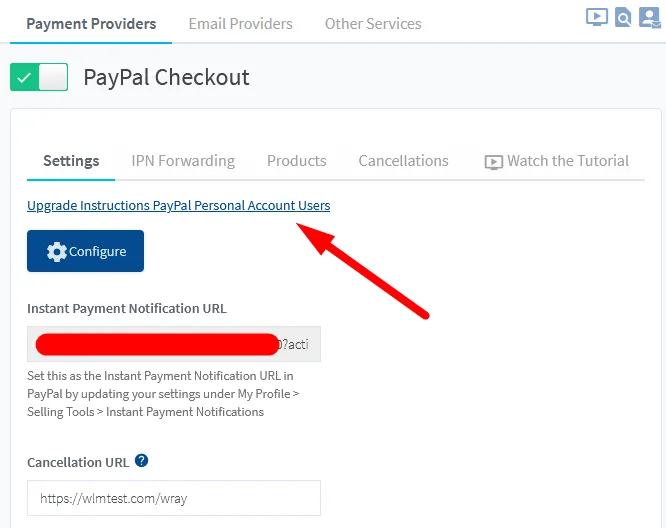
The Settings tab will appear and you will see the “Upgrade Instructions PayPal Personal Account Users” link. A PayPal Business account is required to setup the integration with WishList Member. If you have a PayPal Personal account, you will just need to upgrade your account accordingly.
—
Upgrade to a PayPal Business Account
This step is only required if you don't already have a PayPal Business account. If you have a PayPal Personal account, you can upgrade to a PayPal Business account pretty quickly.
This is because PayPal provides the option to Upgrade to a PayPal Business account when logged into your PayPal Personal account.
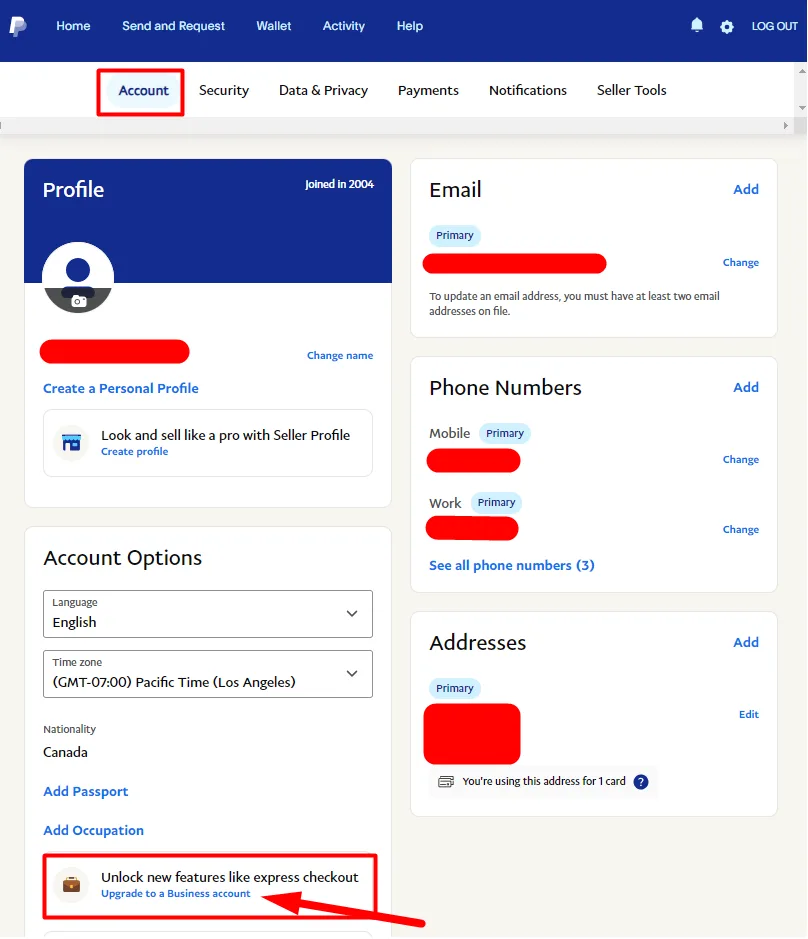
You can go to the Account > Profile section in your PayPal account and click the “Upgrade to a Business account” link. That link appears near the bottom of that section in PayPal.
—
You can enter the information requested by PayPal and follow the steps they provide to upgrade from a PayPal Personal account to a PayPal Business account.
Connecting WishList Member and PayPal
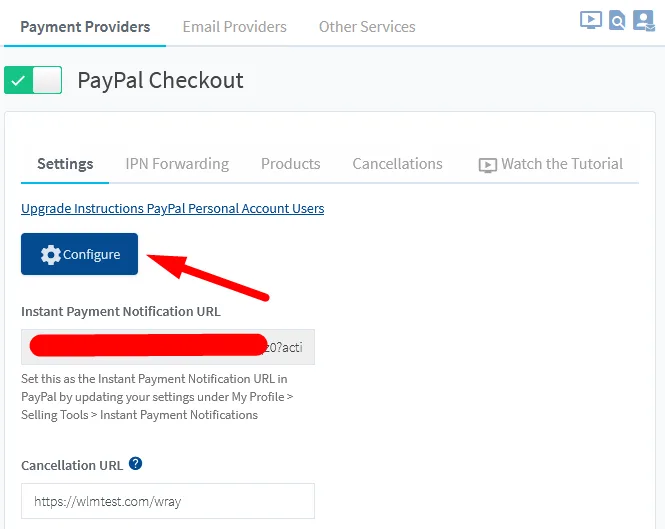
The blue Configure button is used to create the connection between WishList Member and PayPal.
—
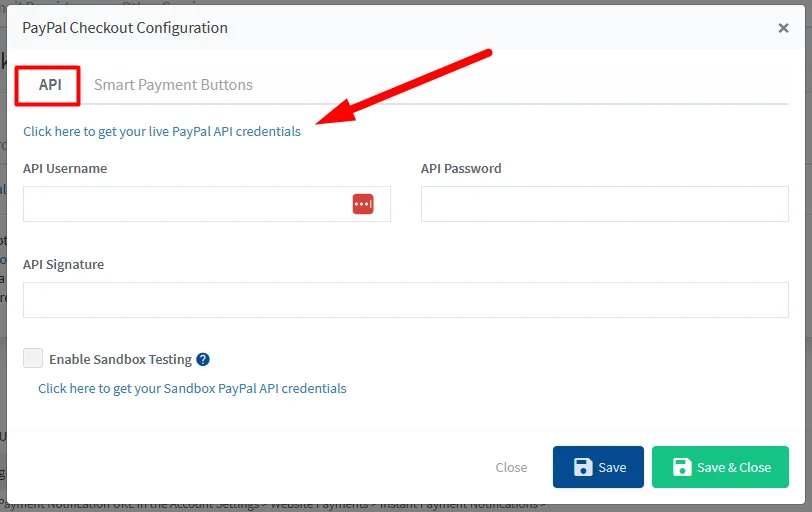
Once you click the blue Configure button, the PayPal Checkout Configuration popup will appear and the API tab is displayed.
You can click the “Click here to get your live PayPal API credentials” link to login to your PayPal account and get the required API information to create the connection.
—
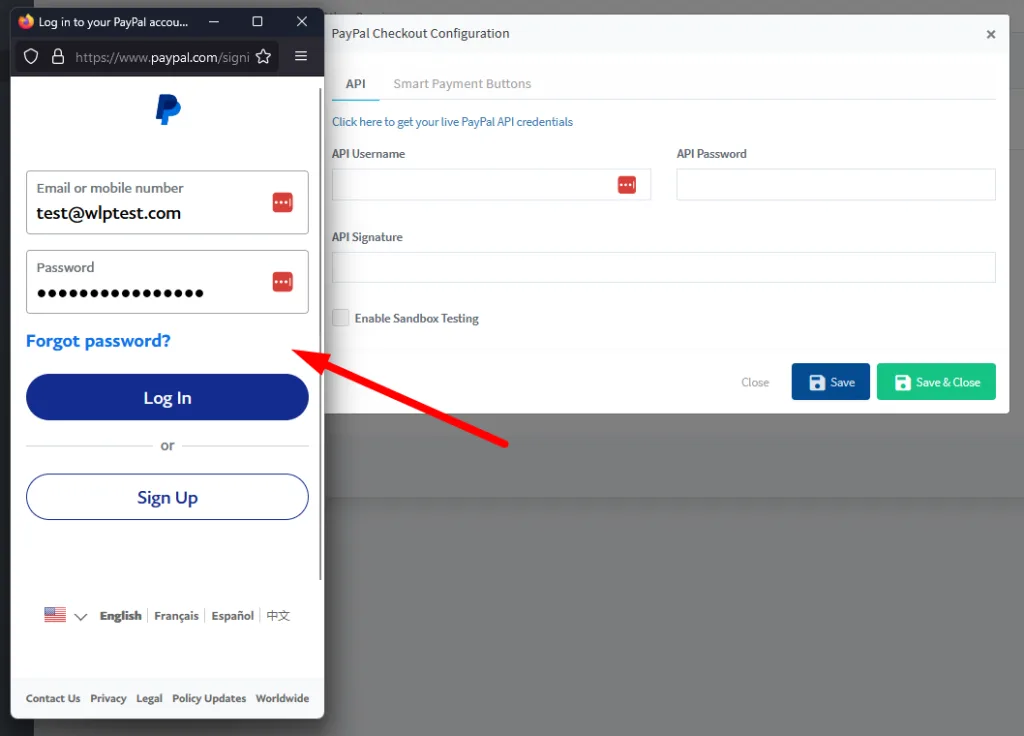
A PayPal popup will appear and you can login to your PayPal account.
—
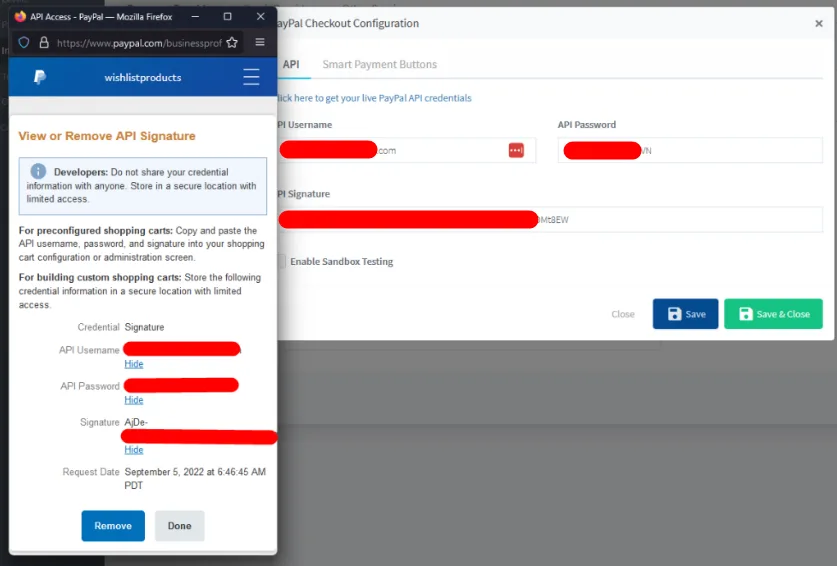
This will display the “View or Remove API Signature” section of PayPal and you will see the API Username, API Password and Signature. These three pieces of information are needed to create the connection between WishList Member and PayPal.
—
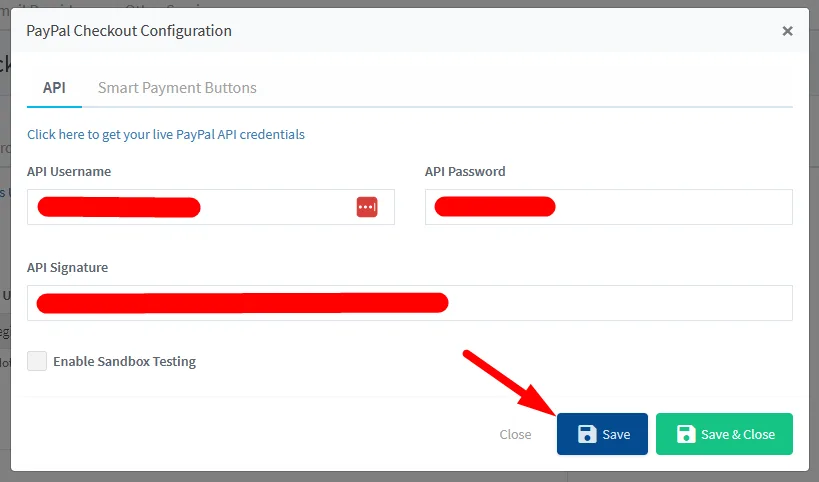
Copy the API Username, API Password and Signature from PayPal and paste them into the corresponding fields in WishList Member and click the Save button.
—
PayPal Sandbox Testing (Optional)
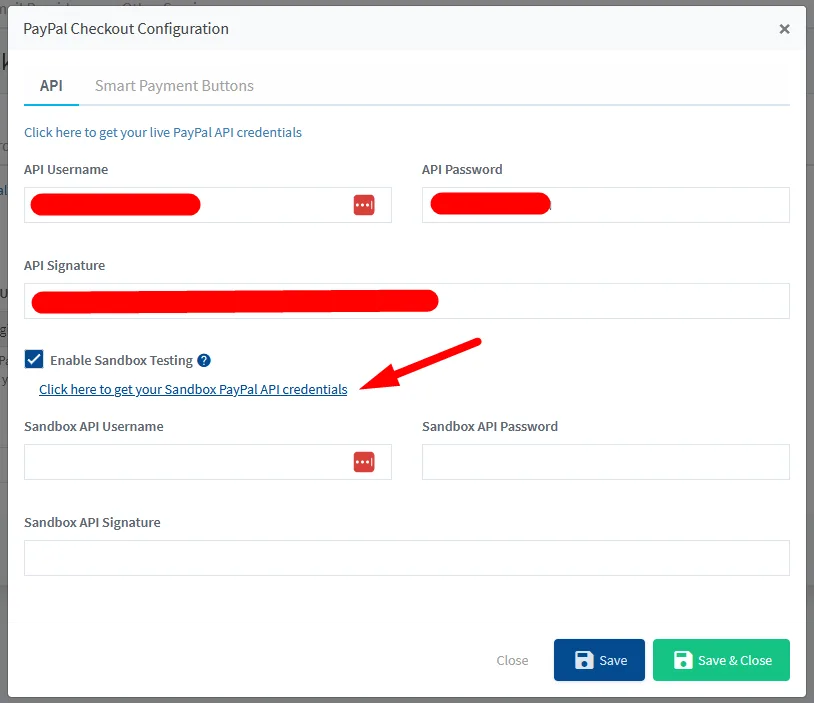
Within the PayPal Checkout Configuration popup, you will notice an option to Enable Sandbox Testing. You can login to your PayPal Sandbox account and get the required API information to create the connection.
Three fields will appear if you enable the Sandbox Testing option. Sandbox API Username, Sandbox API Password and Sandbox API Signature.
You can click the “Click here to get your Sandbox live PayPal API credentials” link to login to your PayPal Sandbox account and get the required Sandbox API information to create the connection.
—
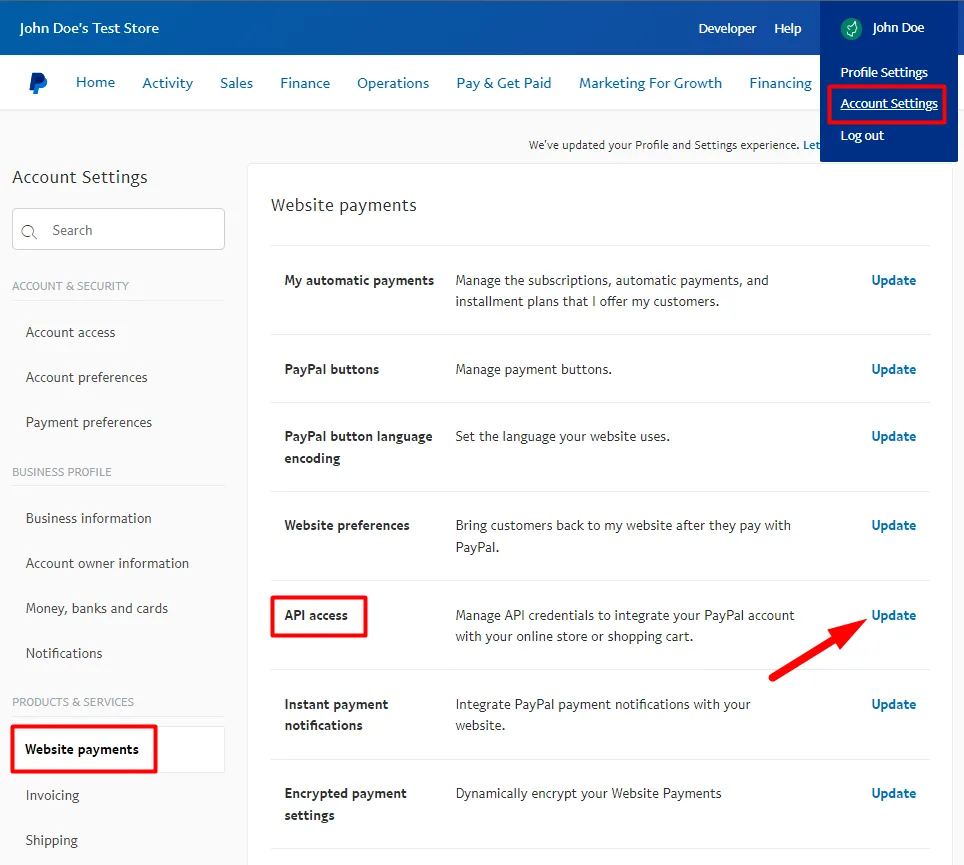
The Sandbox API Username, Sandbox API Password and Sandbox API Signature are located in the Account Settings > Website Payments > API Access > Update > NVP/SOAP API integration (Classic) > Manage API Credentials section of your PayPal Sandbox account.
—
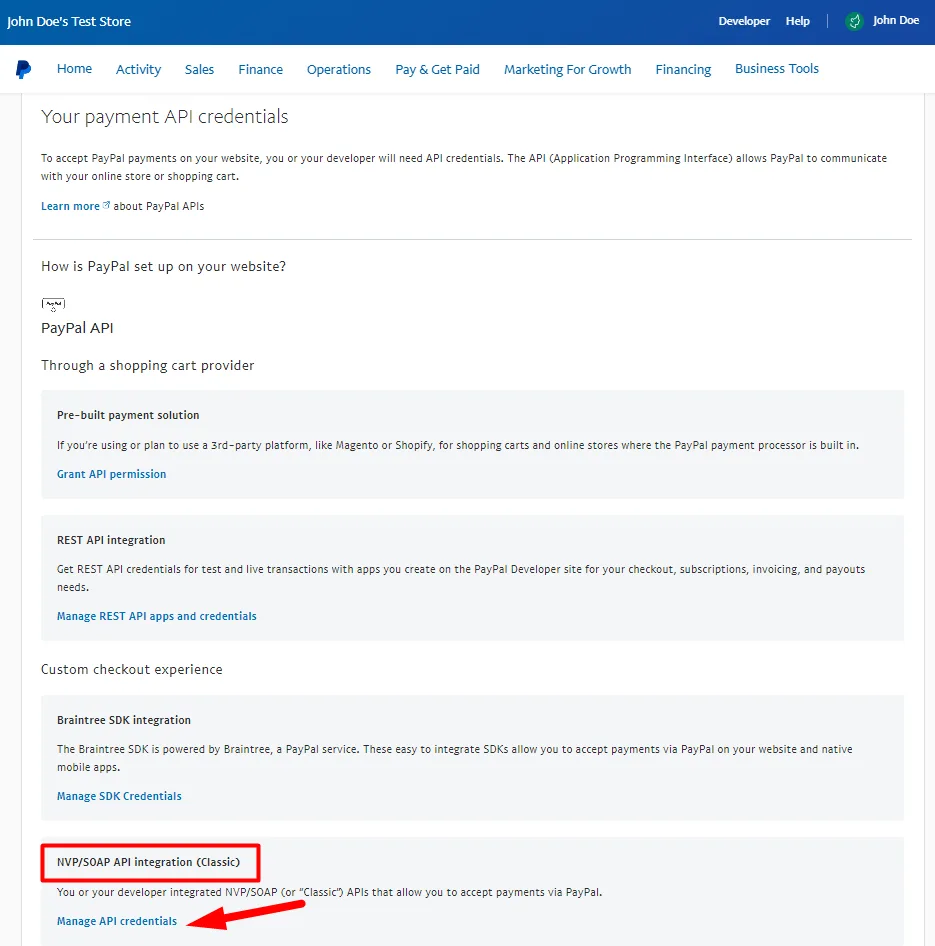
—
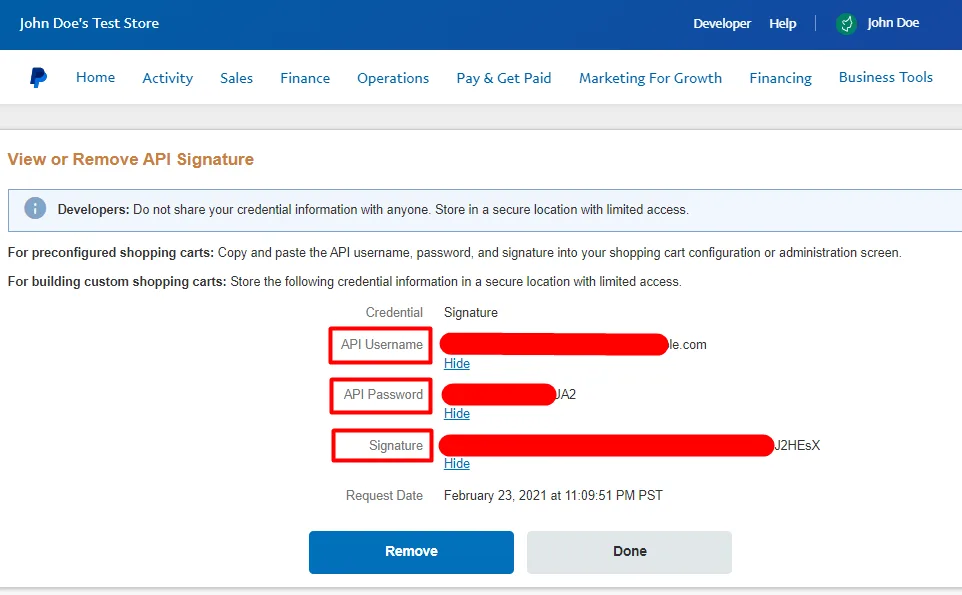
—
Copy the Sandbox API Username, Sandbox API Password and Sandbox Signature API from the PayPal Sandbox site and paste them into the corresponding fields in WishList Member and click the Save button.
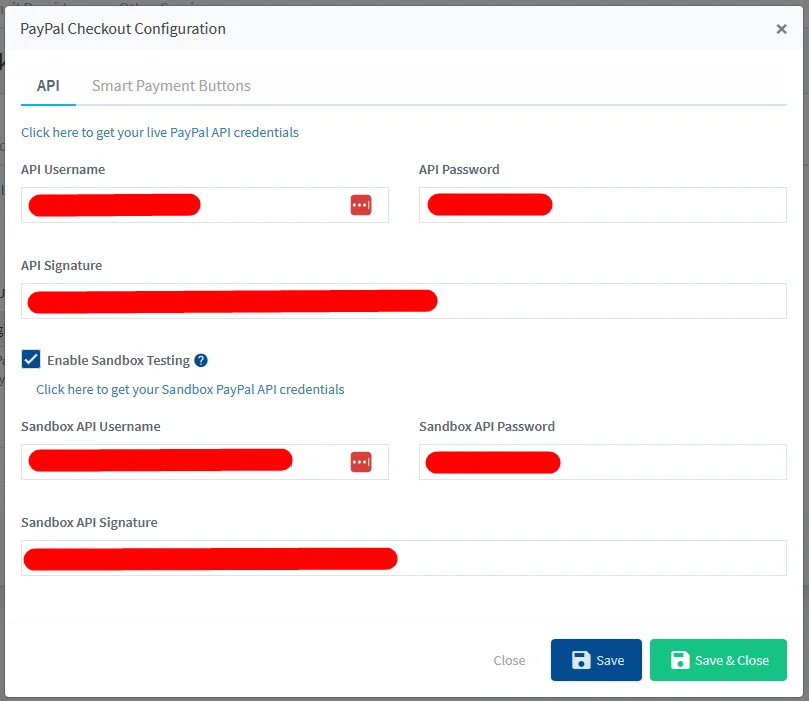
—
With the Sandbox API Username, Sandbox API Password and Sandbox Signature API saved and the Sandbox Testing option enabled, you will be able to test the purchase/registration process using PayPal Sandbox once the integration process is complete.
PayPal Smart Payment Buttons (Optional)
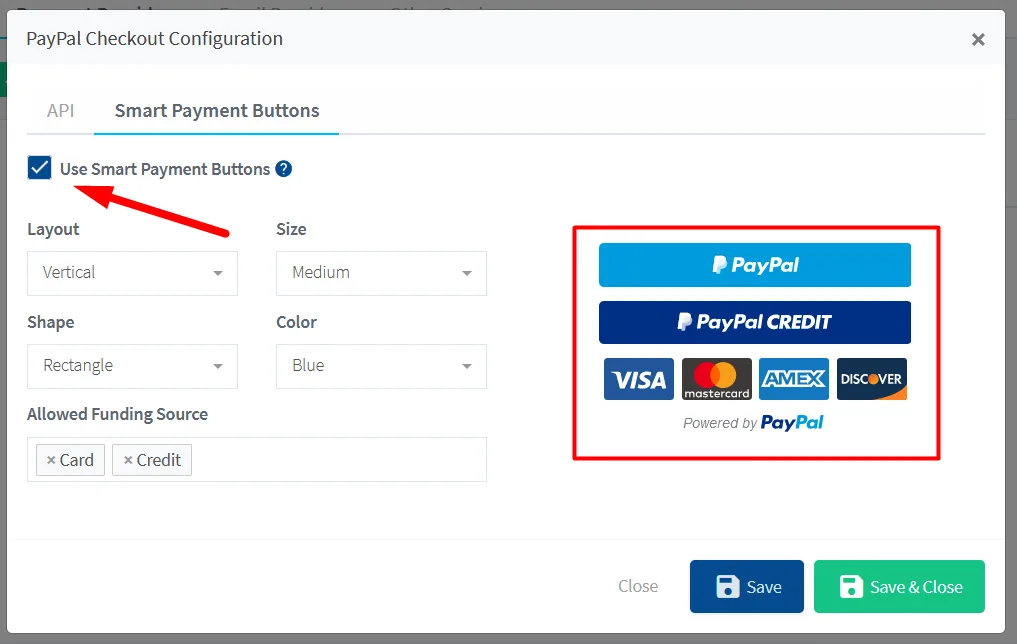
The second tab in the PayPal Checkout Configuration popup is named Smart Payment Buttons. If enabled, these optional settings allow you to adjust the appearance of PayPal Smart Payment Buttons. These buttons can help provide a simplified checkout for users by automatically presenting the most relevant payment types available. The payment types presented by PayPal can depend on the location of the user.
The screenshot example below shows the “Use Smart Payment Buttons” option enabled and the following settings adjusted.
Layout – Vertical
Size – Medium
Shape – Rectangle
Color – Blue
Allowed Funding Source – Card and Credit
You can adjust these settings based on your preferences if you use the PayPal Smart Payment Buttons option. Adjusting these settings will change the appearance and layout of the PayPal Smart Payment Button in real time. You will see those changes applied on the right side of the popup and you can use the Save button when the PayPal Smart Payment Button appears how you would like.
—
Instant Payment Notification URL
The final step to connect WishList Member and PayPal is to copy the Instant Payment Notification URL from WishList Member and paste it into PayPal.
The Instant Payment Notification URL appears in the Settings tab in WishList Member.
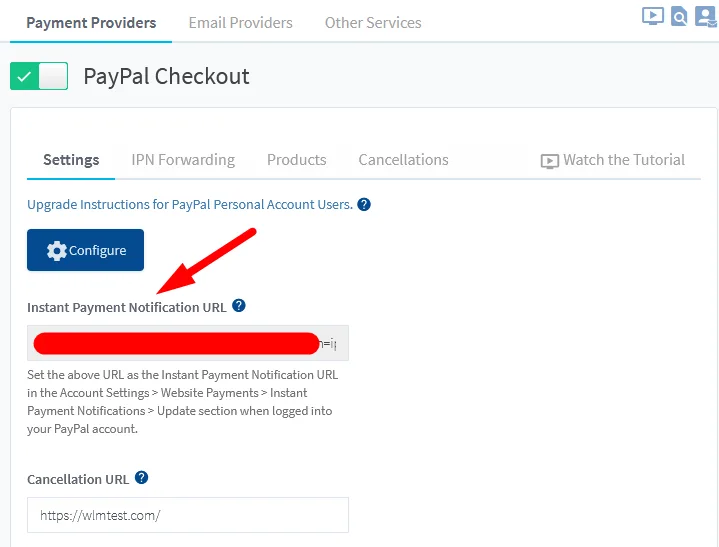
—
You can paste that URL into the Account Settings > Website Payments > Instant Payment Notifications > Update section when logged into your PayPal account.
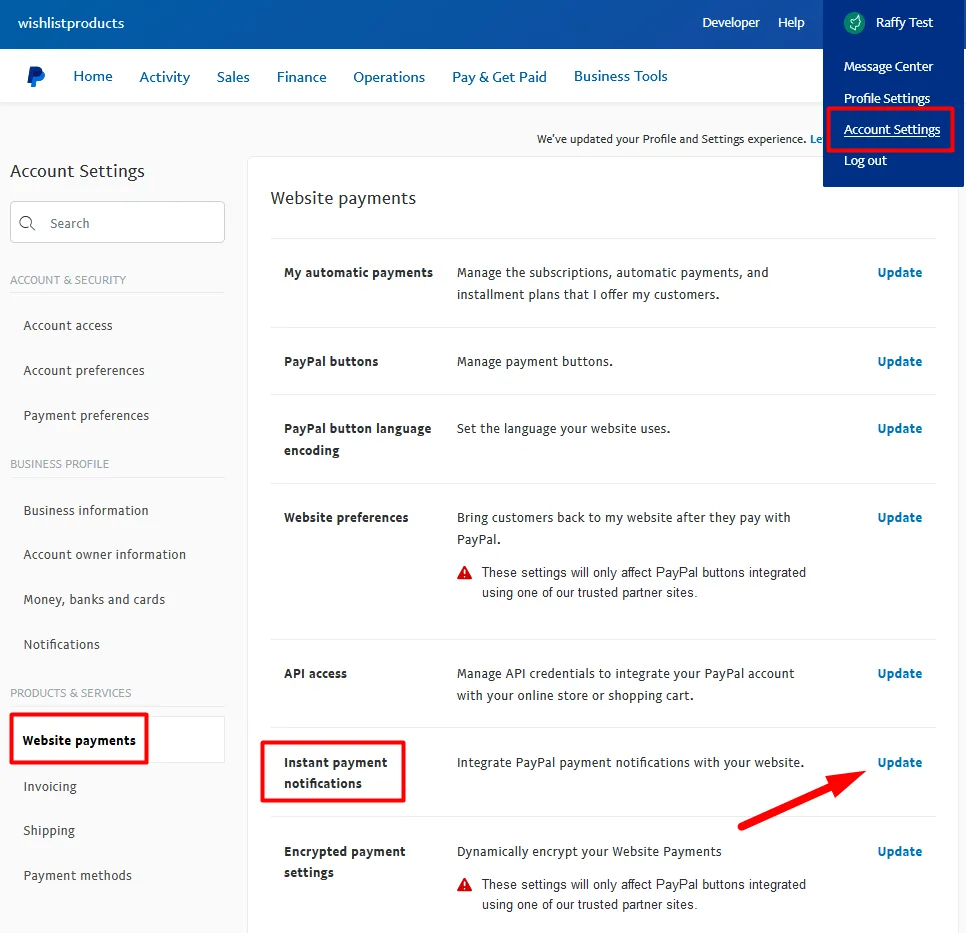
—
Below is a screenshot of how that section appears in PayPal.
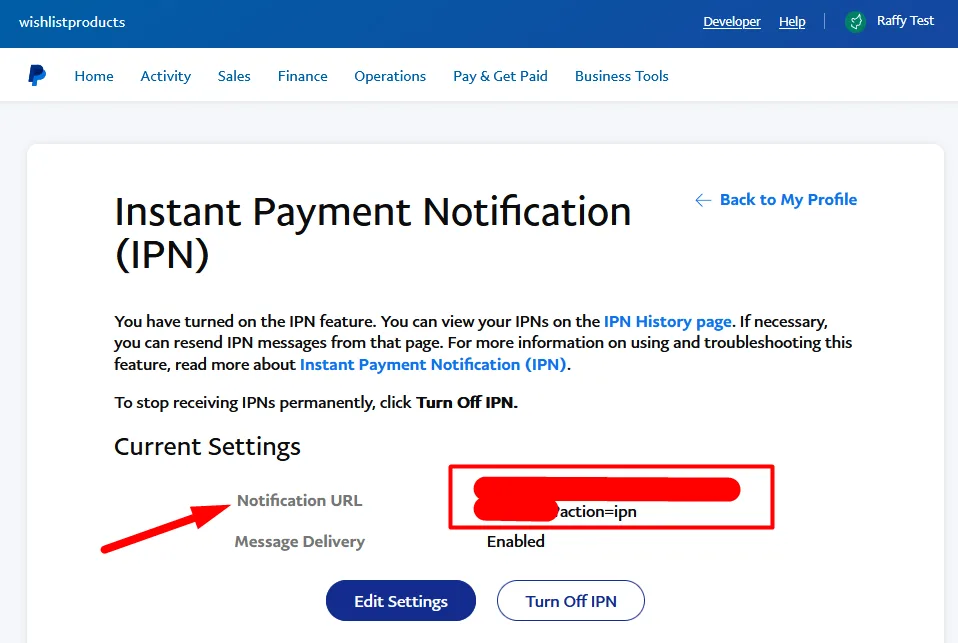
—
You will also see a Cancellation URL in the Settings tab. This is the URL a user will be sent to if they cancel their purchase on the PayPal Checkout page. This will be set to your site home page by default but you can set it to another page if you prefer.
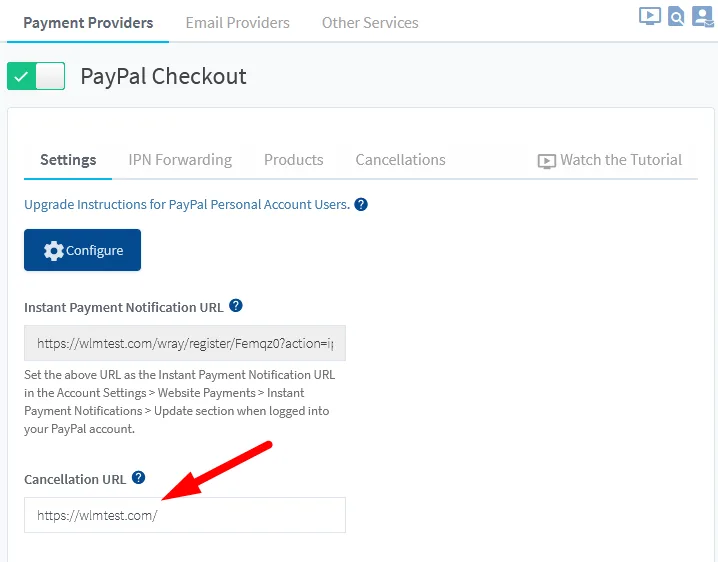
–
This completes the process of connecting WishList Member with PayPal. Once you have entered the Instant Payment Notification URL into PayPal, you can continue with the integration process.
IPN Forwarding (Optional)
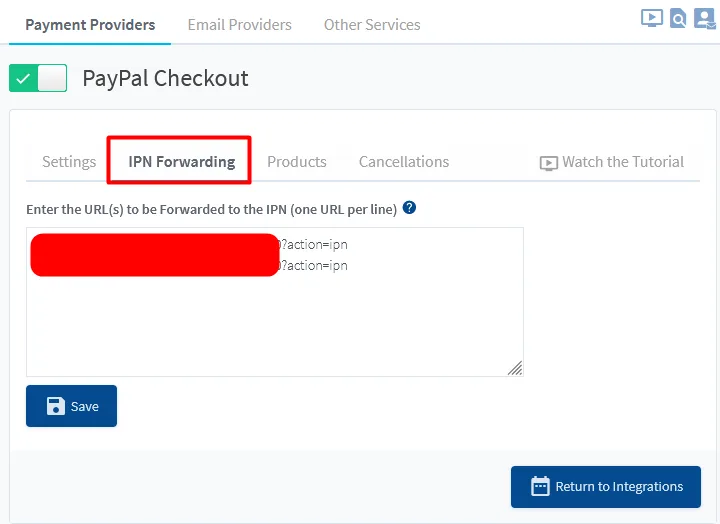
The IPN Forwarding section of the PayPal integration is an optional feature for those who want to use one PayPal account on multiple WishList Member sites. You can ignore this option if you are only using your PayPal account on one WishList Member site.
PayPal allows for one Instant Payment Notification URL (IPN URL) to be set for a PayPal account. So, WishList Member provides an IPN Forwarding option that allows for forwarding of an IPN to multiple URLs.
This means one PayPal account can be used on multiple WishList Member sites if you paste the URL(s) into the IPN Forwarding section of WishList Member.
You can paste one or more IPN URLs into the field provided in WishList Member if you want to use your PayPal account on more than one WishList Member site.
—
Integrating a PayPal Product with WishList Member
With the API Username, API Password and Signature now pasted and saved in WishList Member and the IPN URL pasted and saved in PayPal, you can create a new product. This product will add the user to a membership level (or pay per post, course, team plan) in WishList Member when they pay.
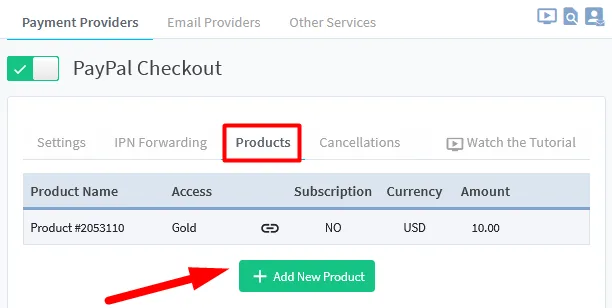
You can create a product by clicking the green “Add New Product” button in the Products tab in WishList Member.
—
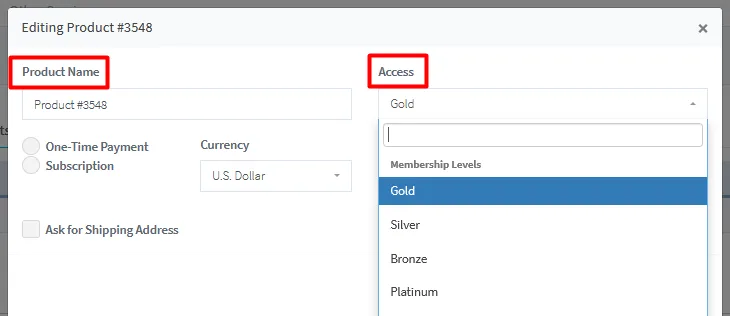
The Editing Product popup will appear and you can adjust the available options. A default name for the product will be shown and you have the option to change that name to something you prefer. You will also need to set which Membership Level, Pay Per Post, Course or Team Plan the user will be added to when they purchase. Selecting a membership level in the Access dropdown is a typical choice but the other options are available.
The example below shows a product named Product #3548 and the Gold membership level selected.
—
You can select if the payment will be a One-Time Payment or a Subscription. We will run through each of those options below.
Product – One-Time Payment
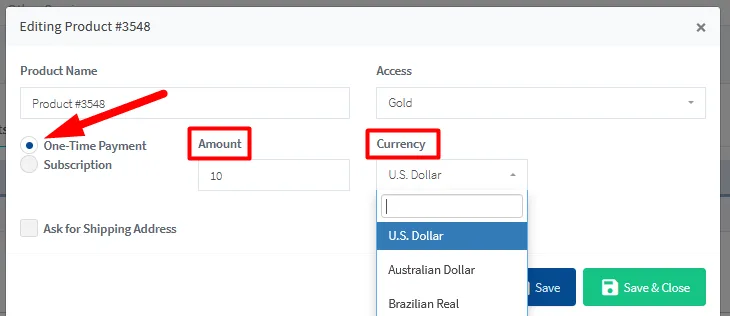
Selecting the One-Time Payment option will display two fields you can adjust.
Amount – This sets the price for the payment. The user will pay this price as a one-time payment.
Currency – This sets the currency of the payment. The user will pay the price in the set currency.
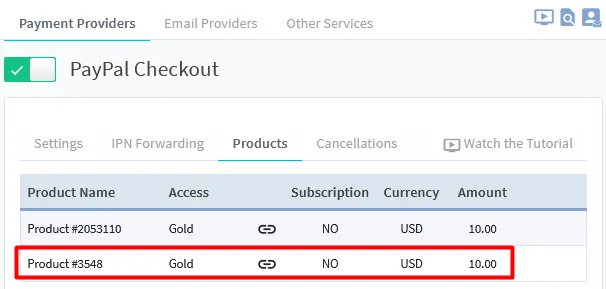
The example below shows a product name Product #3548 with a One-Time Payment set for $10.00 USD (U.S. Dollars). Clicking the Save button will apply these settings. This means the user would pay a one-time price of $10 and would be added to the Gold membership level.
—
The new product appears on the Products list once the settings are saved. It shows the Access set to the Gold membership level, the currency set to USD and there is No subscription.
—
Product – Subscription
Selecting the Subscription option will display five fields you can adjust (and two optional fields if Trial Period is enabled).
Amount – This sets the price for the payment. The user will pay this price each billing cycle.
Currency – This sets the currency of the payment. The user will pay the price in the set currency.
Billing Cycle – This sets the billing cycle in Days, Weeks, Months or Years.
Stop After – This sets when to stop the subscription after the set number of billing cycles. This can be set to 1 cycle and up to 52 cycles or Never (ongoing subscription).
Max Failed Attempts – This sets the maximum numbers of attempts to process a payment after it fails. The default number is 3 but this can be set to what you prefer.
If Trial Period is Enabled (Optional):
Trial Amount – This sets the price of the payment for the trial period. The user will pay this price for the trial.
Trial Duration – This sets the length of time for the trial period in Days, Weeks, Months or Years.
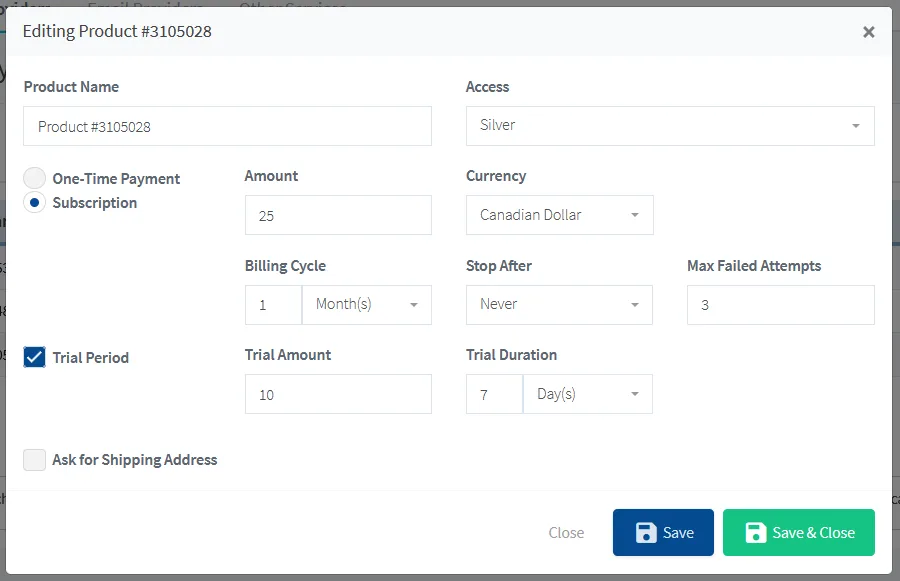
The example below shows a product named Product #3105028 with a Subscription set for $25.00 CAD (Canadian Dollars) with a 1 month billing cycle set to never stop (ongoing subscription) with a maximum number of failed attempts set to 3. The optional Trial Period has been set to $10.00 for 7 days.
Clicking the Save button will apply these options. This means the user would pay $10 to start a 7 day trial and and would be added to the Silver membership level. That user would then pay the $25 monthly subscription moving forward.
—
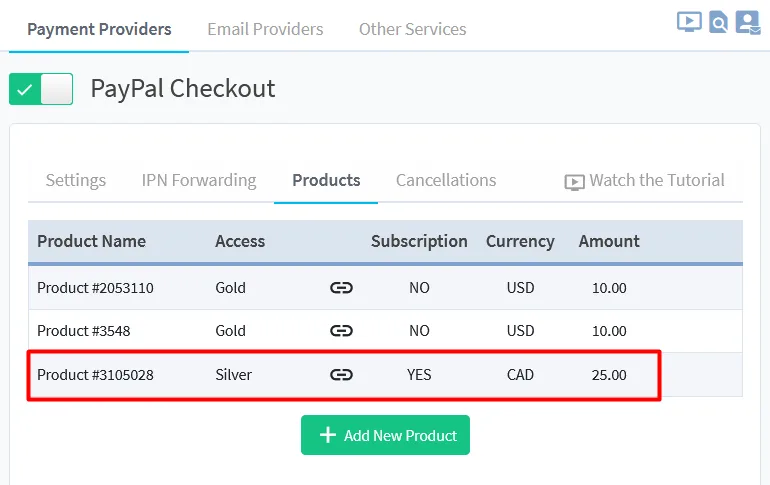
The new product appears on the Products list once the settings are saved. It shows the Access set to the Silver membership level, the currency set to CAD and there is a subscription.
—
—
Product – Cancellations
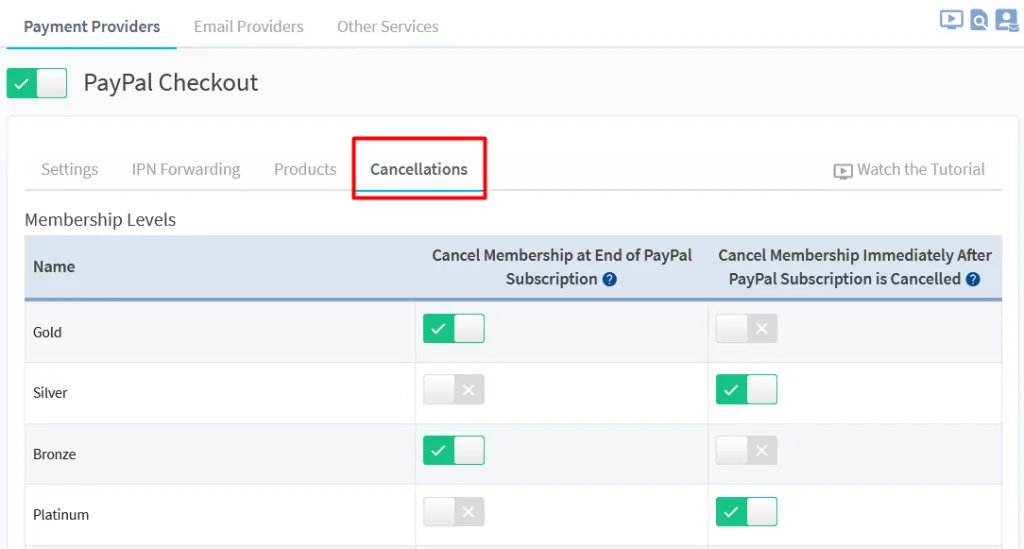
You have two available options related to handling membership cancellations in WishList Member if your product is set as a Subscription in PayPal. These options only apply for products with a subscription and can be configured in the Cancellations tab.
—
Cancel Membership at End of PayPal Subscription – If enabled, the membership will be cancelled in WishList Member when the subscription ends in PayPal. As an example, if a subscription has a billing cycle set to charge once a month for a total of 6 months in PayPal, the membership in WishList Member will be cancelled at the end of the 6 month subscription.
If disabled, the membership will continue to be active in WishList Member when the subscription ends in PayPal. As an example, if a subscription has a billing cycle set to charge once a month for a total of 6 months in PayPal, the membership in WishList Member will remain active at the end of the 6 month subscription.
Cancel Membership Immediately After PayPal Subscription is Cancelled – If enabled, the membership will be immediately cancelled in WishList Member if the user cancels the subscription in PayPal. In this example, a subscription has a billing cycle set to charge once a month for a total of 12 months in PayPal and the monthly re-bill is on the 21st. If the user cancels the subscription in PayPal on the 4th, their access will be immediately cancelled in WishList Member.
If disabled, the membership in WishList Member will remain active and will wait for the end of the current billing cycle before access is cancelled. This means the member will retain access after they cancel the PayPal subscription until the end of that billing cycle. In this example, a subscription has a billing cycle set to charge once a month for a total of 12 months in PayPal and the monthly re-bill is on the 21st. If the user cancels the subscription in PayPal on the 4th, they will retain access to the membership until it is cancelled on the 21st of the month.
—
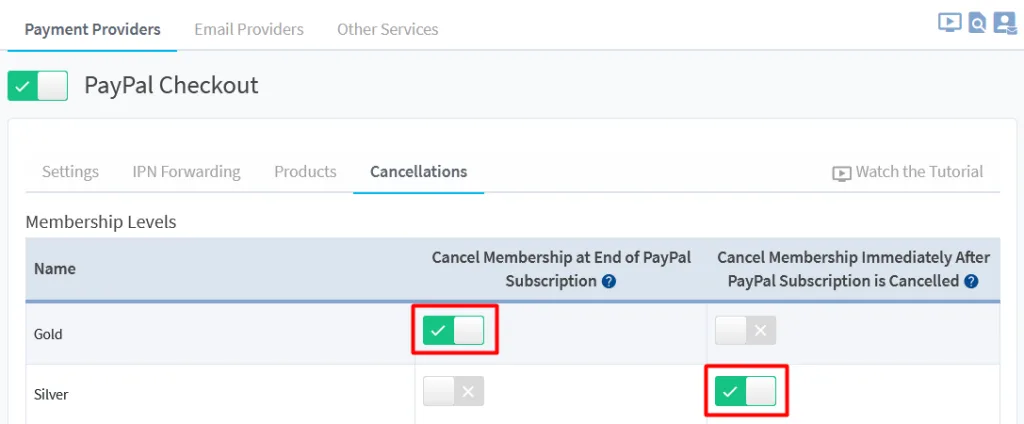
In the example below, users in the Gold membership level would retain access to the Gold membership level until the subscription ends in PayPal and users in the Silver membership level would lose access to the Silver membership level immediately if they cancel their subscription in PayPal.
—
PayPal Payment Link / Payment Button
The final step in the integration process is placing your PayPal payment button on a page/post on your site or using your PayPal payment link. Anyone who uses that button/link to purchase will be automatically added to the corresponding membership level (or pay per post, course, team plan) in WishList Member and will be able to access any assigned content.
PayPal Payment Link
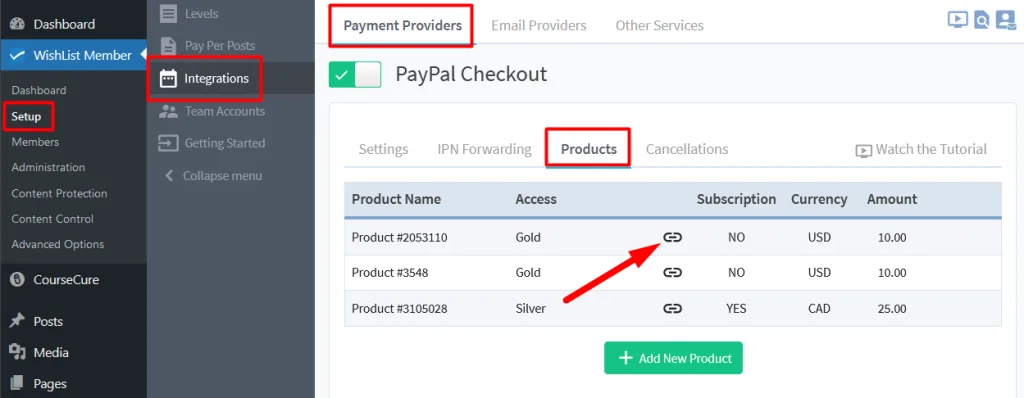
You can access the purchase payment link for your product in the Setup > Integrations > Payment Providers > PayPal > Product section of WishList Member.
—
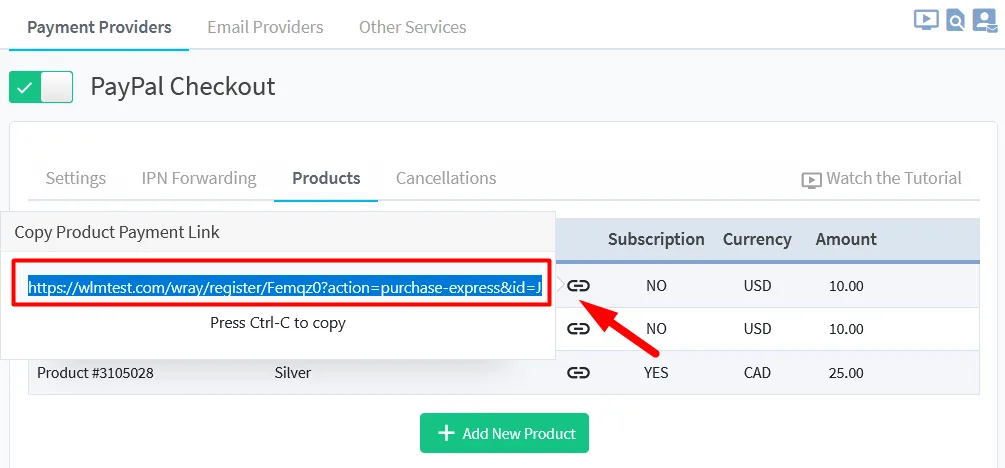
Click the link icon and the “Copy Product Payment Link” popup will appear. You can copy this link and use it to allow users to pay and register. Anyone who uses this payment link will be directed to a purchase/registration form and will be able to pay through PayPal to gain access to your site.
—
PayPal Payment Button
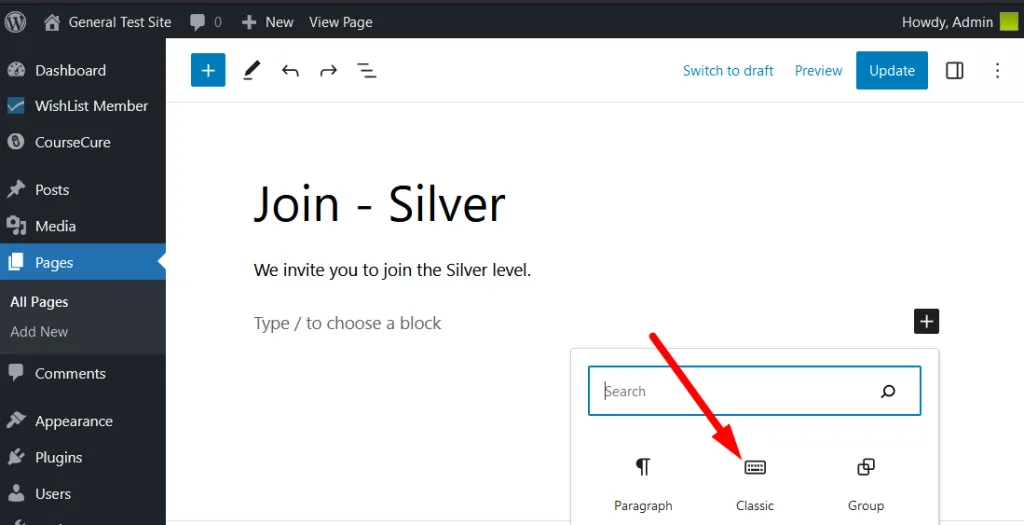
Any WishList Member mergecodes or shortcodes can be inserted into a page or post by using a Classic Block in the WordPress Gutenberg editor. The blue WishList Member mergecodes or shortcodes inserter appears once you add a Classic Block to a page or post. You can add a Classic Block to the page or post.
—
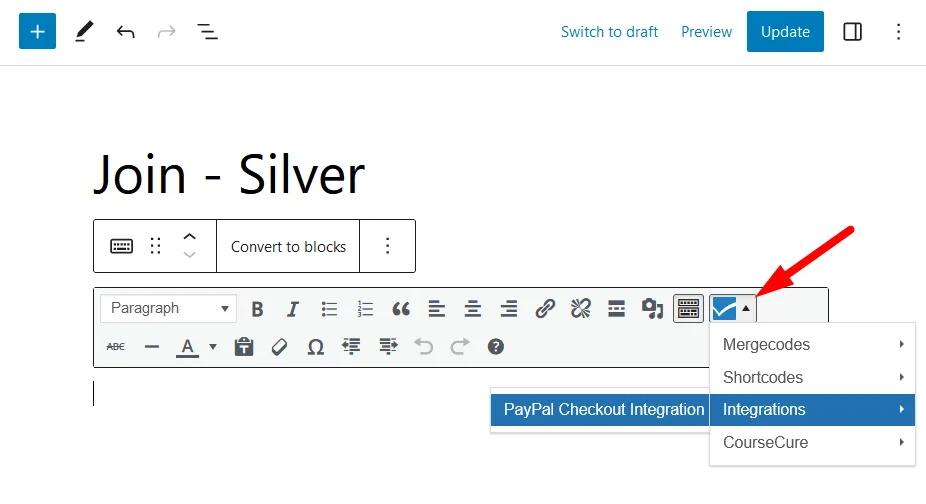
Then you can click the blue WishList Member mergecodes or shortcodes inserter > Integrations > PayPal Checkout Integration option within the Classic Block.
—
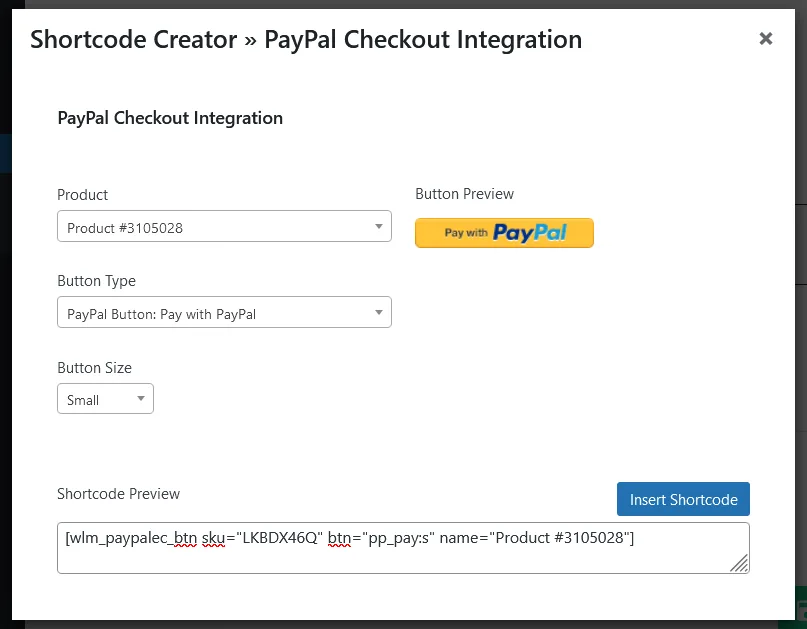
The Shortcode Creator > PayPal Checkout Integration popup will appear and you can use the available options to create a PayPal button.
Product – Select the product. This list of products pulls from the Setup > Integrations > Payment Providers > PayPal > Products section in WishList Member.
Button Type – Select the type of PayPal button. You can set different text to appear on the button. You also have the option to create a button with custom text.
Button Size – Select a small, medium or large size button.
Shortcode Preview – A preview of the shortcode is displayed and changes in real time based on the options selected. The shortcode can also be copied from this section and pasted into any page or post.
The example below shows a small PayPal button with the text “Pay with PayPal” created for Product #3105028. Click the Insert Shortcode button and that button will be inserted into the page.
—
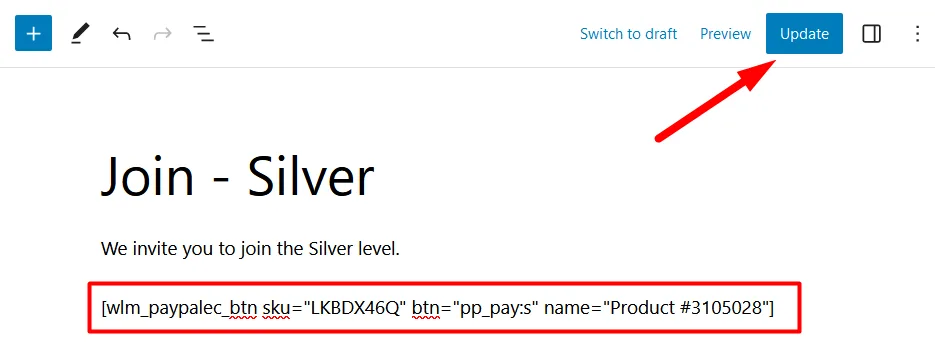
You can include any additional information on the page and can click Update once it's ready.
—
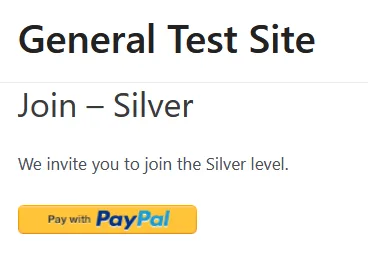
The created PayPal button now appears on the live site and users can click it to begin the purchase/registration process. Anyone who pays and registers will be added as a member on your site.
—
You can create a PayPal payment link/button for any membership levels, pay per posts, courses or team plans on your site using the integration details provided above. This will allow users to pay and join your membership. The PayPal payment button or payment link can be used on any of your site pages or posts (including your sales page).
—
