Turn up revenue and repeat custom to the max when you elevate your ecommerce experience with the WooCommerce Wishlist Member integration. Discover how easy it is to bring the power of memberships to your WooCommerce site.
Contents
Hey there, future ecommerce rockstars! ?
Ready to take your online store from ‘meh' to ‘mind-blowing'?
We've got a game-changer for you. Imagine turning every purchase into an invitation to an exclusive club, where members enjoy juicy discounts, first dibs on new releases, and a whole lot more.
Welcome to the wish-come-true world of integrating WishList Member with WooCommerce.
Make your customers feel like VIPs while boosting your bottom line like never before.
Let's rock n roll!

Click here for step-by-step instructions on building your membership site using WordPress.
The Magic Combo: WishList Member + WooCommerce
WishList Member joining forces with WooCommerce opens up a whole world of possibilities for your ecommerce store. We’re talking perks, rewards, and cool member-only deals! Open your customers up to:
Special Membership Perks
Imagine someone buys a t-shirt from your store. Now, what if buying that shirt automatically made them part of an exclusive club? A club where they get first dibs on new releases or an inside scoop on upcoming sales?
WishList lets you automatically bump customers into different membership levels based on what they buy. Talk about rolling out the red carpet!

Discounts Galore: Spice Up Your Pricing
Everyone loves a good deal. And as a store owner, you'll love how WishList lets you customize your prices for your loyal members. You can offer fixed prices, percentage-based discounts, or even a fixed-amount off the regular price.
You can even dish out discounts based on what type of stuff they're buying—like all skincare products or ebooks, for example.
How To Setup WishList Member & WooCommerce Integration
Step 1: Set Up WishList Member
First thing's first—make sure WishList Member is up and running on your WordPress site. From your WordPress dashboard, go to Plugins > Installed Plugins and search for WishList Member.
Can't find it? No worries! Just follow this easy-peasy tutorial we've got for you.
Step 2: Create Membership Levels
Alright, you've got WishList Member ready to roll. Now let's carve out those cool membership levels.
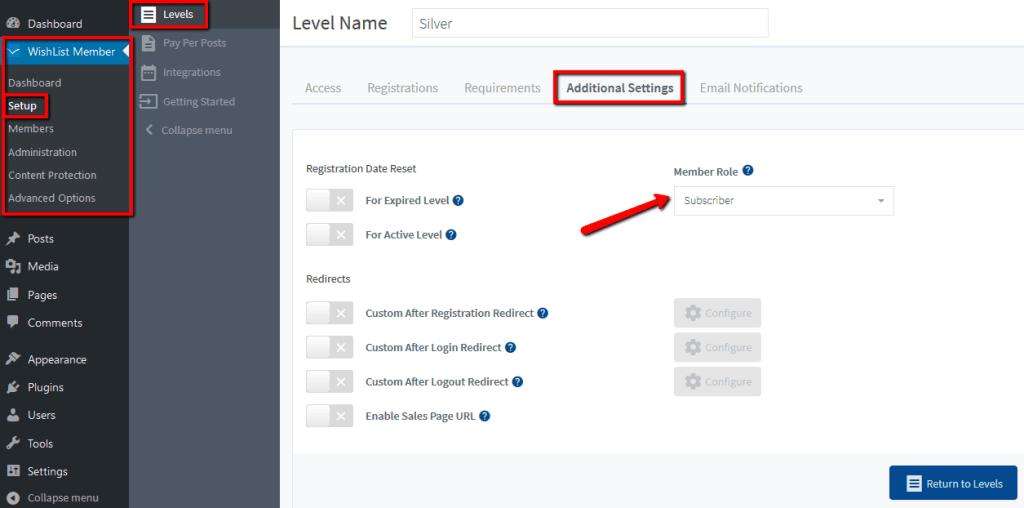
Go to WishList Member > Set Up > Levels. Hit that plus sign and name your new level—maybe something snazzy like “VIP Membership” or just a simple “Subscriber.”

You might also want to set up membership levels based on how you want to group your customers. For example, you might create a “skincare” level or a “homeware” level depending on which products your members buy.
Don't sweat the small stuff, like settings, for now. You can always circle back and fine-tune things later. Once you've got your level named, we're good to go for the next step!
Step 3: Install WooCommerce for Easy-Peasy Ecommerce
Next up, we need WooCommerce. It's a super popular free plugin—5 million people can't be wrong, right?
Head to Plugins > Add New and type in “WooCommerce.”
Then hit Install, and then Activate.

Oh, and if a setup wizard pops up, just give it the ol' Skip Setup click for now.
Step 4: Activate the WishList Member WooCommerce Integration
Now it's time to blend this duo together with the flick of a switch! Head to WishList Member > Setup > Integrations. In the Payment Providers tab scroll down and click on WooCommerce.
Toggle the integration so that it's switched on like so:

Click Return to Integrations to complete setup.
Step 5: Configure Payment Gateways
Alright, now let's talk about getting you paid! In your WordPress dashboard, scoot on over to WooCommerce > Settings > Payments. Follow the cues to activate PayPal, and drop in your PayPal email.
If you plan to use Stripe as well, you can install an additional plugin for that purpose. Remember to save your changes once you're done.
How to Automatically Assign Membership Levels to WooCommerce Products
Now your Wishlist Member WooCommerce integration is all set up, it's time to explore the amazing things you can do with it!
The first is automatically giving membership access to customers who buy a product in your online store. This is a great way to add value to your products and keep your existing customers engaged with your brand.
Say you're selling a recipe book on your ecommerce store; you can offer automatic access to protected content such as demonstration videos, cookalongs or an online cooking course.
With the WishListMember WooCommerce integration, it's simple to connect your products to a membership level (or multiple levels) so that customers automatically become members.
Step 1: Add Your Product
Head over to Products > Add New.
Fill in the details and click Publish such as product name, description, image, and any tags and categories.

Step 2: Change Access Settings
Staying on the product page, scroll down to the Product data section, and click on the WishList Member tab (see image above.)
Under Access, click in the box next to Membership Levels and select the level you want purchasers of this product to access. You can select multiple levels if you wish. Any time someone buys that product they get instant VIP access to your exclusive online club. ?

This is where your custom levels come in really handy. Say you run a lifestyle site that sells homeware, skincare products and fashion accessories. When a customer purchase a homeware product, they can automatically be assigned the “Homeware” membership level, and get access to special, targeted content and product discounts.
You can even integrate WishList Member with your email provider and send targeted emails specifically for people who have purchased homeware products from your site.
- Hit Publish or Update, and voila! You're all set.
How To Set Special Member Pricing
The WishList Member WooCommerce integration also lets you set up sweet deals and discounts on your WooCommerce products for your existing members. And it couldn't be easier!
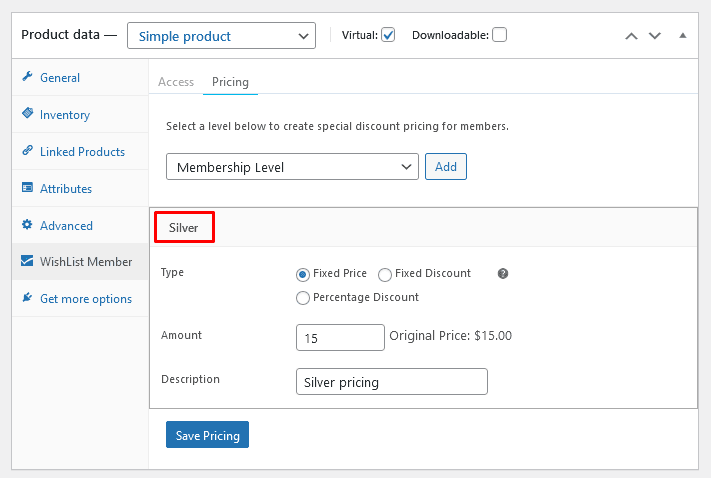
On the same Product data section you used to manage access, click on the Pricing tab. Then click on the Membership Level dropdown menu.

Select the membership level you want to create a special member price for and hit Add.
Then a bunch of pretty self-explanatory options will come up.

You can choose to offer a special fixed price, a fixed discount (e.g. $5 off) or a percentage discount (e.g.25% off).
The text you write in the Description field will be what is displayed on your live site.
Once you're done click Save Pricing, and hey presto! It's as simple as that.
You can add another level to manage the discount for that level. If your members belong to multiple levels, they'll be shown the discount for whichever level is closest to the top of the list.
Click and drag the list icon (it looks like 3 lines) to reorder the member levels.

Conclusion
In the dynamic world of ecommerce, standing out is paramount. By integrating WishList Member with WooCommerce, you're not just selling products; you're offering an experience. This powerful combination allows you to:
- Turn Customer Loyalty To The Max
By turning purchases into exclusive memberships, you're making your customers feel valued and special. Hello, increased repeat business and brand loyalty! - Boost Revenue with Special Pricing
Offering member-exclusive discounts can incentivize purchases and increase your average order value. Whether it's a fixed discount, a percentage off, or a special price, members will appreciate the savings, and keep coming back for more. - Automate Membership Assignments
Automatically assign membership levels based on purchases, streamlining the process and enhancing the experience for your customers. - Pump Up Product Value
By bundling products with exclusive content access, you're adding more value to every purchase. This can differentiate your store from competitors and justify higher price points. - Simplify Management
Both WooCommerce and WishList Member are user-friendly, and their integration is designed to be intuitive. This means less time fiddling with settings and more time focusing on growing your business.
Want a bonus, biz boosting tip? Once you're all set up with WishList Member, you'll want to shout your site's new features from the rooftops. Well, there's a low-risk cost-effective solution to help you do just that:
- Create an Affiliate Program
Outsource your sales team with a WooCommerce affiliate plugin that can easily add a plug and play affiliate program to your WooCommerce site.
In just a few clicks, you can set up your site to support an affiliate program, and incentivize customers and affiliate fans to drive traffic and conversions on your site! We highly recommend using this method to get the word out there and accelerate your growth.
But back to the topic at hand – the WishList Member and WooCommerce integration is, in short, a game-changer. It's about creating a holistic shopping experience, where customers don't just buy a product; they join a community.
So, if you're looking to elevate your ecommerce game, this integration is your ticket to the big leagues. Rock on, ecommerce maestros! ??
Get Started With WishList Member Today
Transform customer experience on your WooCommerce site. It all starts with our robust membership plugin.
- Get WishList Member
- Use the NEW Quick-Start WIZARD, training videos and support
- Launch Your Site!
If you have questions, reach out to our support team here.


