
The ability for members to create and manage accounts for other members is beneficial for many different types of membership sites. Being able to set a member as a Team Admin so they can take care of adding new Team Members frees you up from handling this task and also opens the door for you to sell access to your site through Team Plans.
This means you can offer a Team Plan with access to selected protected content and a Team Admin can invite or add a set number of Team Members to gain access using that Team Plan. You can create Team Plans and set which content the Team Members can access, how many Team Members it contains and more.
You can also assign a Team Plan to a Team Member and they become a Team Admin. This gives the Team Admin the ability to add and remove Team Members or invite anyone to become members of teams they manage.
Team Members can have the same access as the Team Admin or you can adjust the specific access the Team Members will receive.
You as the WordPress Site Admin have the flexibility to create Teams that can access only the content you specify and Team Admins can handle the rest.
—
Create a Team Account
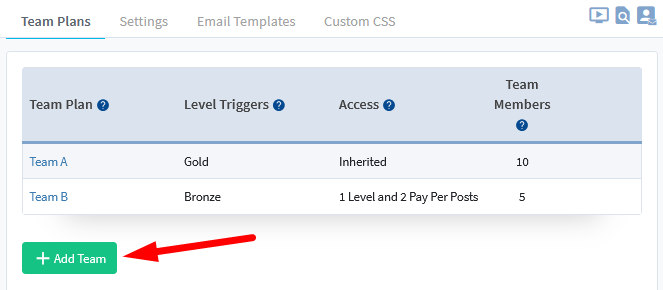
You can create and manage the settings, Team Plans and more in the Setup > Team Accounts section in WishList Member. The screenshot below shows the Team Plans section.

—
Click the Add Team button to create a Team Plan based on your specifications.
—
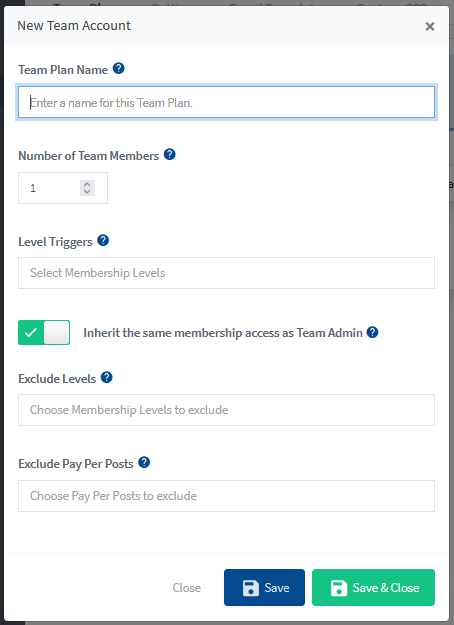
The New Team Account popup will appear and you can select the options that fit your needs. These options are explained in more detail below the screenshot.
—
Team Plan Name. The name of the Team Plan. This name will be viewable in the WishList Member admin section and on the Team Management page on the live site.
Number of Team Members. The default number of Team Members for this Team Plan.
Level Triggers. A Team Admin account for this Team Plan will be automatically created when a user registers for any of the set level(s) or is added to any of the set level(s).
Inherit the same membership access as Team Admin (If enabled). If enabled, all Team Members will inherit the same membership access as the Team Admin. All Team Members would have access to the same content as the Team Admin.
- If Enabled: Exclude Levels. Team Members will not be able to access protected content assigned to the set level(s).
- If Enabled: Exclude Pay Per Posts.Team Members will not be able to access protected content assigned to the set pay per post(s).
Inherit the same membership access as Team Admin (If disabled). If disabled, you can set the level(s) and/or pay per post(s) Team Members can access. You can select the specific level(s) or pay per post(s) you would like the Team Member to be able to access.
- If Disabled: Team Member Level Access. Team Members will be able to access protected content assigned to the set level(s).
- If Disabled: Team Member Pay Per Post Access. Team Members will be able to access protected content assigned to the set pay per post(s).
—
An Example of a Team Plan
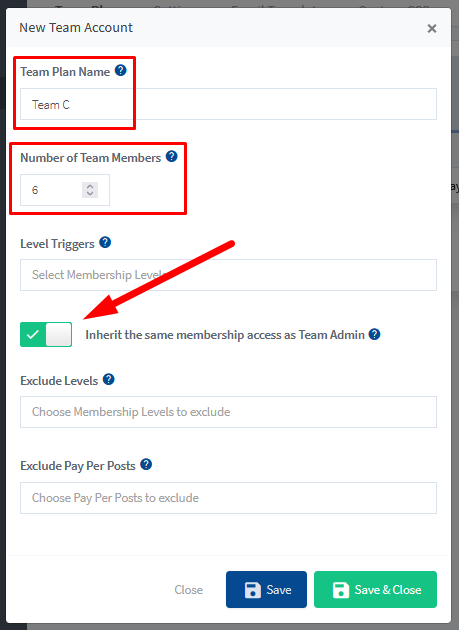
This screenshot shows an example of a Team Plan being created named Team C with 6 Team Members. The “Inherit the same membership access as Team Admin” option is enabled.
—
These settings will result in all Team Members in Team C inheriting the same membership access as the Team Admin. So as an example, if the Team Admin has access to content assigned to the Gold membership level, all Team Members will be able to access that same protected content accessible by members of the Gold membership level.
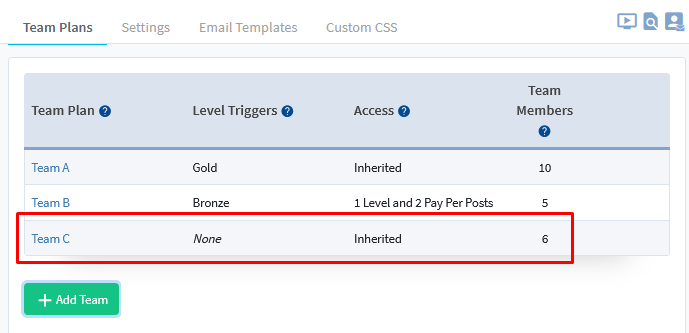
Once the Save button is clicked in the New Team Account popup, the new Team Plan is created and can be seen on the list of Team Plans.
—
Create a Team Admin
You can set any user you would like to be a Team Admin. A Team Admin can add a Team Plan by selecting from the Teams you have created and they can also set the number of Team Members that can be added to the selected Team Plan.
Team Admin – Create a Team Admin by Assigning them a Team Plan
A user can be set as a Team Admin by clicking to edit their user account in the Members > Manage section of WishList Member.

—
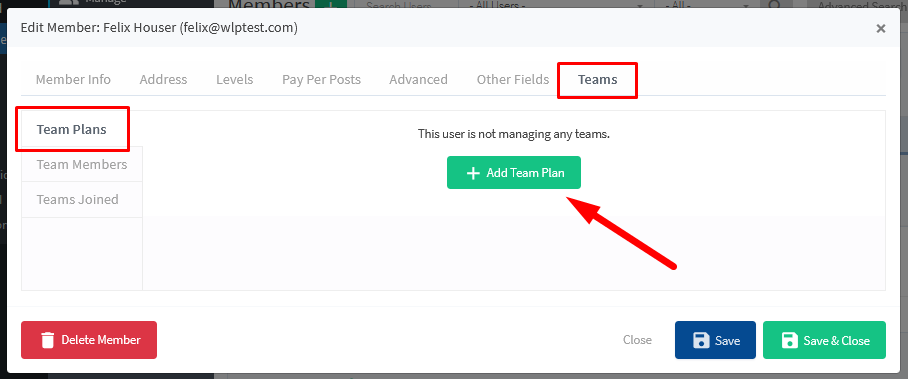
The Edit Member popup will appear and you can see the Teams > Team Plans section. The Add Team Plan button can be used to add a Team Plan to the user account which will make the user a Team Admin.
Any user who is assigned a Team Plan becomes a Team Admin.
—
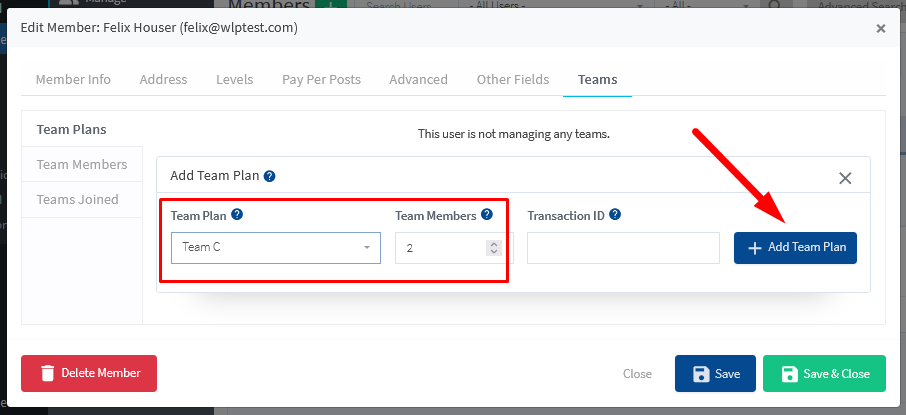
Clicking the Add Team Plan button will display the Add Team Plan form. You can select the Team Plan to be assigned to the Team Admin. Any Team Plans you have created will be available in the Team Plans dropdown.
You can also set the number of Team Members the Team Admin can add to the selected Team Plan and a Transaction ID will be created automatically if you don’t enter one.
The example screenshot below shows Team C has been selected and 2 Team Members can be added to this Team Plan by the Team Admin. The Team Plan will be added to the user when the Add Team Plan button is clicked.
—
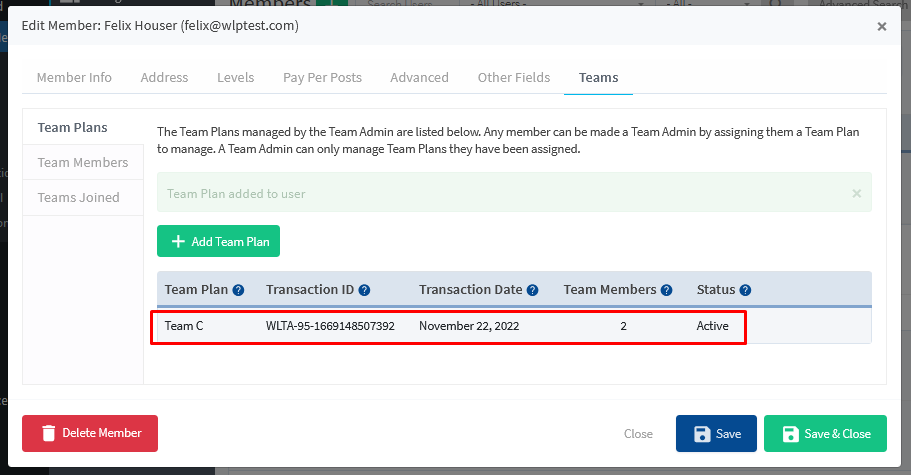
The Team Plan has now been added and the user is a Team Admin for that Team Plan. The newly added Team Plan is also displayed in a list. The column headings of the list are explained in more detail below the screenshot.
—
Team Plan. The Team Plans managed by the Team Admin.
Transaction ID. The unique Transaction ID tied to the transaction of adding a Team Plan to a Team Admin.
Transaction Date. The Transaction Date tied to the transaction of adding a Team Plan to a Team Admin.
Team Members. The total number of Team Members a Team Admin can add to the Team Plan.
Status. The current Status of the Team Plan. Status can be Active or Cancelled.
—
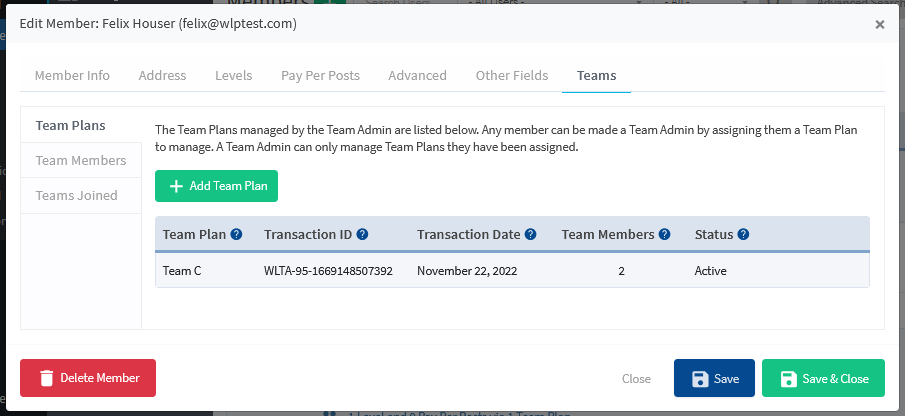
The user is now a Team Admin and you can view their managed Team Plans at any time.
—
You will also see a Team Admin icon appear on the user account in the Members > Manage section of WishList Member.
Clicking the icon will automatically show you the Teams > Team Plans section for the Team Admin.

—
Team Admin – Create a Team Admin using a Level Trigger
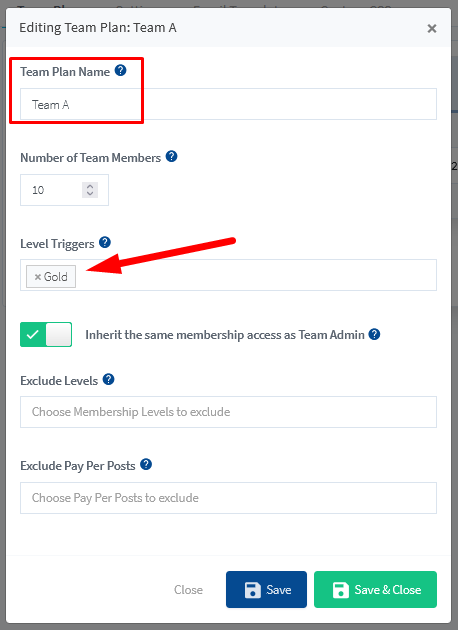
You also have the option to automatically create a Team Admin using the Level Trigger option for a Team Plan. This means you can create a Team Admin account for a selected Team Plan automatically every time a user registers for any of the set level(s) or is added to any of the set level(s).
The example below shows the Gold membership level set as a Level Trigger.
This will result in anyone who joins or is added to the Gold membership level being set as a Team Admin for Team A.
—
Team Admin – Team Members Section
The Team Admin can manage their Team Plans and add new Team Members using the Team Management page on the live site but you as the WordPress site Admin can also view the Team Members and can add new Team Members to a Team Plan if you would like.
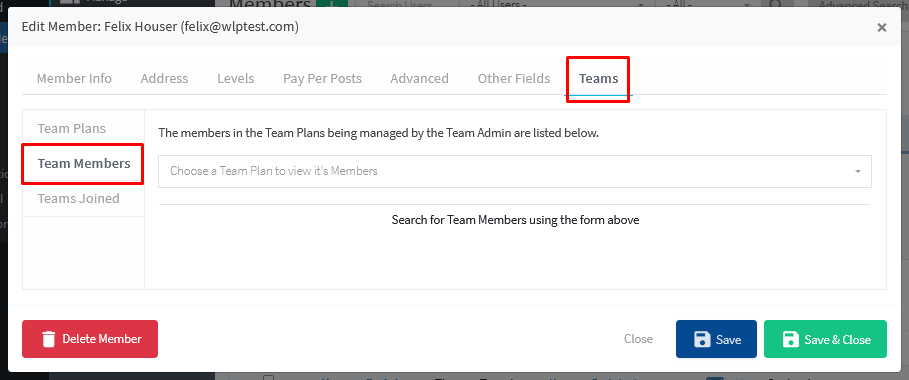
You can view or add new Team Members to a specific Team Plan in the Members > Manage > Click the user’s Team Admin Icon > Teams > Team Members section of WishList Member.

—
The screenshot below shows a close up of the Team Admin icon.

—
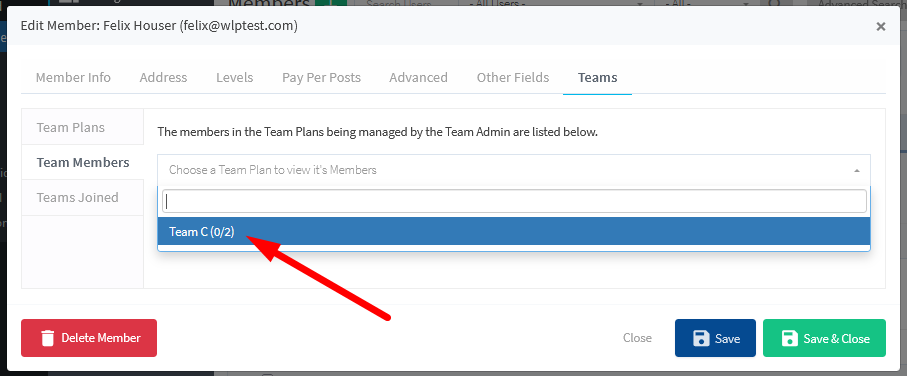
The Edit Member popup will appear and you can view the Teams > Team Members section. You can select any available Team Plan to view its Team Members.
One thing to keep in mind is only Team Plans that have been added to the Team Admin account will be available to select.
—
In this example, one Team Plan (Team C) has been added to the Team Admin and that Team Plan can be selected from the dropdown. You will also notice the number of Team Members in that Team Plan. In this case, it shows 0/2 which means no Team Members have been added to the Team Plan and the Team Admin can add up to two Team Members.
—
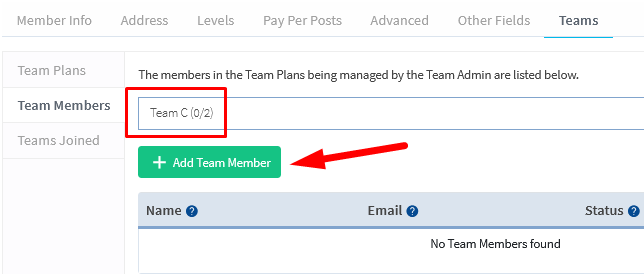
Once the Team Plan is selected, you can click the Add Team Member button.
—
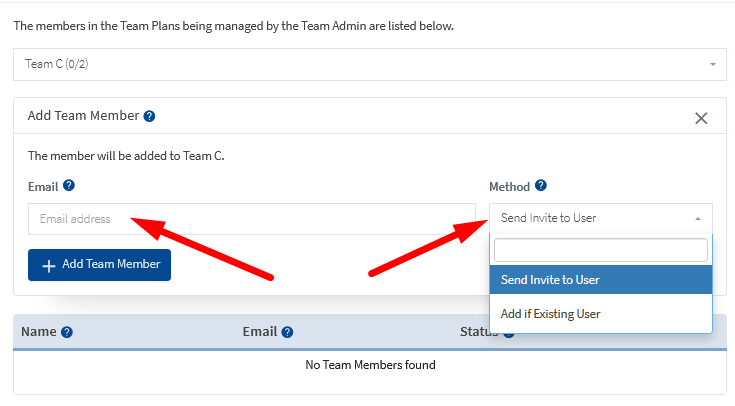
This will display the Add Team Member form. You can enter the email address of the user and select the method to add them to the Team Plan. More details about the fields are included below the screenshot.
—
Email. The email address that will be tied to the Team Member account and used if a Team Invite email is set to be sent based on the method selected.
Method. You can select the method used for the Team Invite email. This email sends a message that contains a link the user can click to become a Team Member of the Team Plan. The Team Invite email can be configured in the Team Accounts > Email Templates section of WishList Member.
- Send Invite to User. If selected, an invite email will be sent to both existing users and new users.
- Add if Existing User. If selected, existing users will automatically be added to the Team Plan and new users will be sent the invite email to join the Team Plan.
—
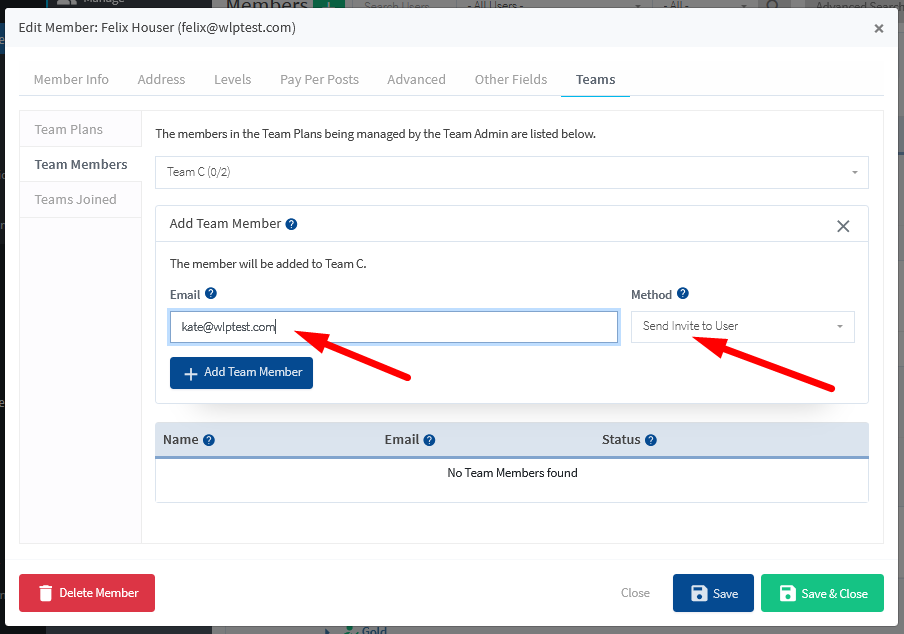
In this example, an email address has been entered and “Send Invite to User” is selected as the Method for the Invite Email.
—
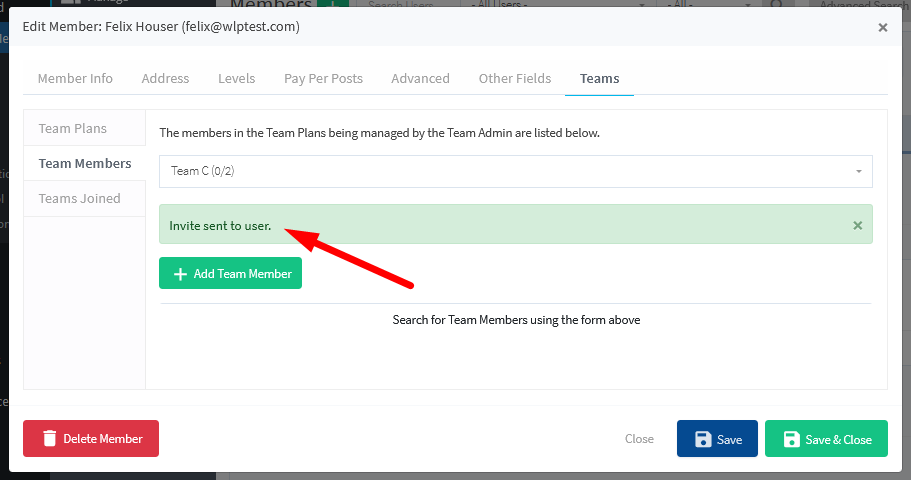
Once you click the Add Team Member button, a notification stating the Team Invite has been sent to the user is displayed.
—
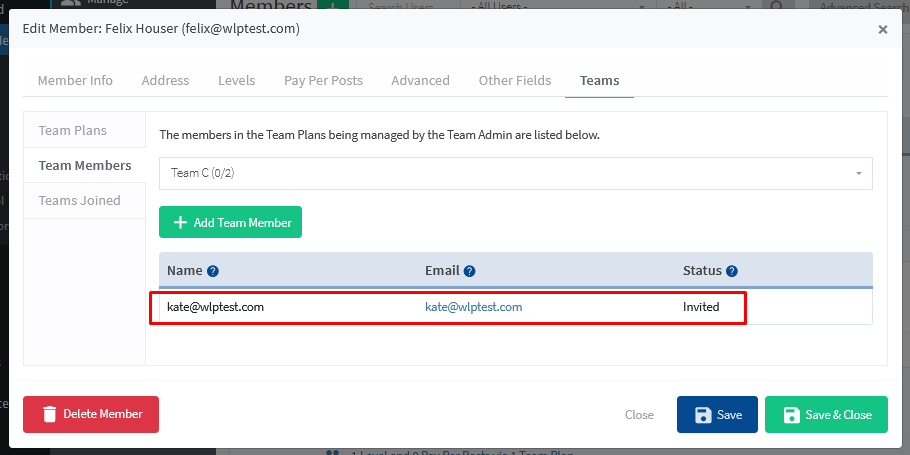
The newly added user now appears on the list with a status of “Invited”. This means the Invite email has been sent and the user can use the link in that email to accept the invitation to join and become a Team Member.
—
Once they accept the invitation, they will be a Team Member and able to access the content assigned to the corresponding Team.
Team Admin – Teams Joined Section
The Team Admin is also able to join Team Plans or be added to Team Plans by other Team Admins. If a Team Admin has joined any Team Plans, they will be listed in the Teams Joined section.
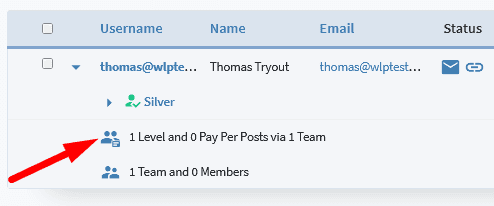
You as the WordPress site Admin can view a list of any Team Plans the Team Admin has joined. You can view the joined Team Plans for a user in the Members > Manage > Click the user’s Team Member Icon > Teams > Joined Teams section of WishList Member.

—
The screenshot below shows a close up of the Team Member icon.
—
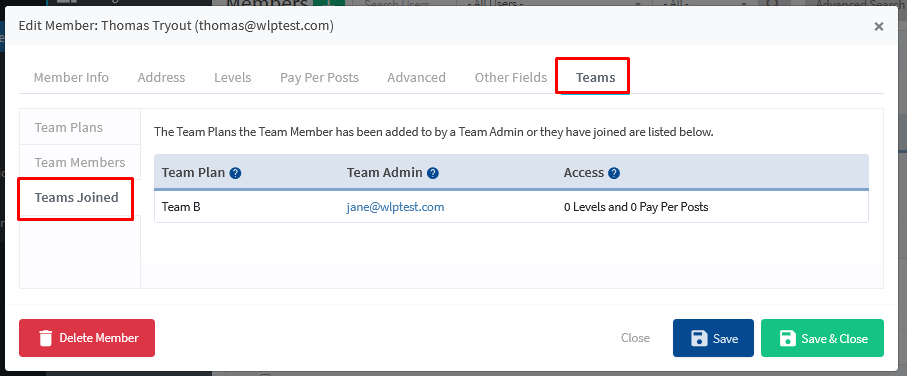
The Edit Member popup will appear and you can see the Teams > Teams Joined section.
In this example, Thomas Tryout has joined Team B and that is displayed in the Teams Joined list. The Team Admin and Access provided for that Team Plan is also displayed.
—
Team Accounts Settings – Team Management Page
The Team Management page appears on the live site and can be used by Team Admins to manage their Team Plan(s). This allows a Team Admin to view their available Team Plans, manage Team Members, invite Team Members and more.
—
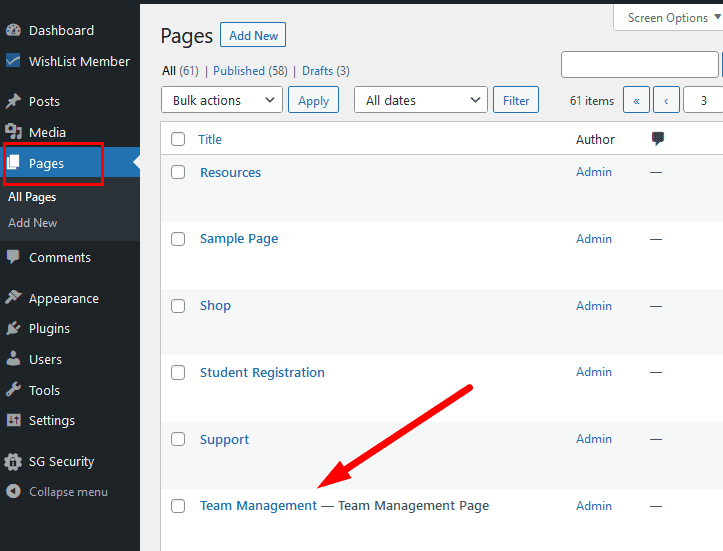
The Team Management page is automatically created and added to the pages section of a WordPress site when using Team Accounts in WishList Member.
—
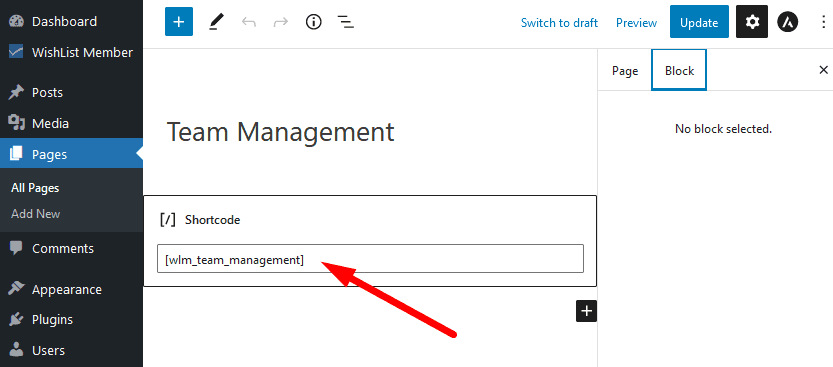
The Team Management page includes a shortcode that handles the display of all the team management functionality that will appear on the live site. But you can add any additional content to the page.
—
You do have the option of setting a different page or creating a new page as a Team Management page. You could insert the Team Management Page Shortcode into any other page on your site.
Team Management Page Shortcode: [wlm_team_management]
But it is recommended to use the default created page as it contains the shortcode that displays the specific content. More info on this is included below.
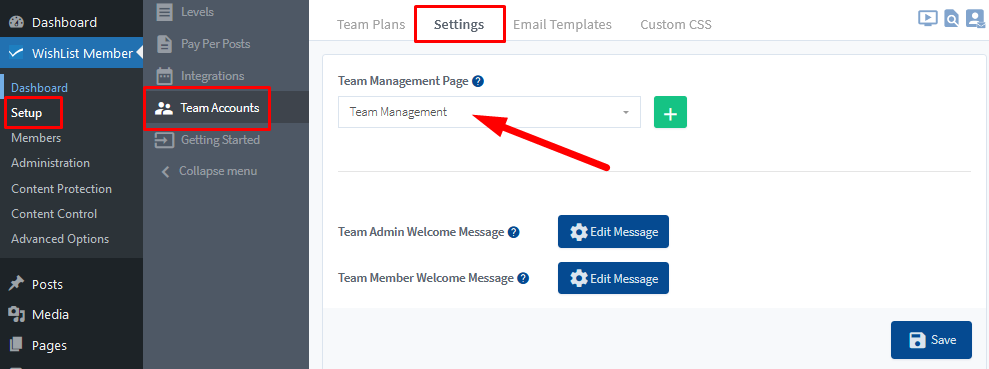
The Team Management Page can be set in the Setup > Team Accounts > Settings section in WishList Member.
—
The default created page displays a list of the Team Plan(s) a Team Admin has access to and a form to easily invite members to join a team.
A list is also displayed showing any existing Team Members and their status.
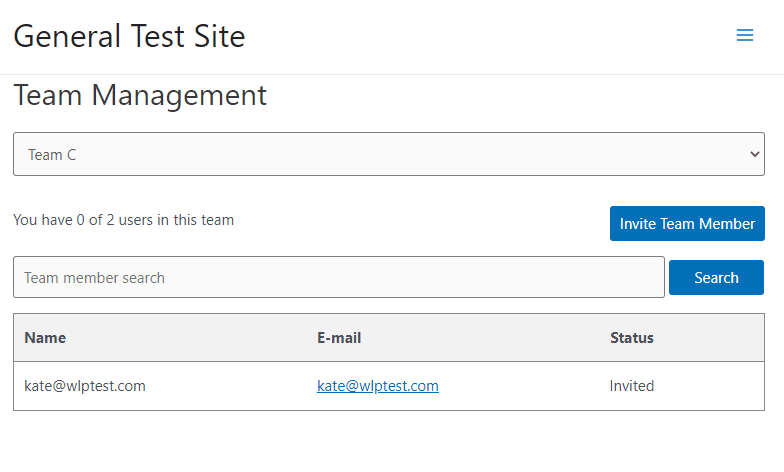
As an example the screenshot below shows a logged in Team Admin viewing information related to their Team C. They can see one user has been invited to become a Team Member. The Invite Team Member button is also available if the Team Admin wants to add another member to the team.
—
The layout and design of the Team Management page has been streamlined and is relatively basic as the selected WordPress theme will handle most of its appearance. That being said, there is a Custom CSS option that can be used with the Team Management page if you want to make adjustments to the look and feel of the page.
Team Accounts Settings – Welcome Messages
There is a default message shown to welcome Team Admins and a default message shown to welcome Team Members. You can edit either of these messages to customize the experience for Team Admins and Team Members.
You will find the default messages in the Setup > Team Accounts> Settings section in WishList Member. You can click the Edit Message button and the corresponding Welcome Message popup will appear.
—
You can edit either of the messages and if you happen to decide you would like to revert to an original message, you can use the Reset to Default Message button.
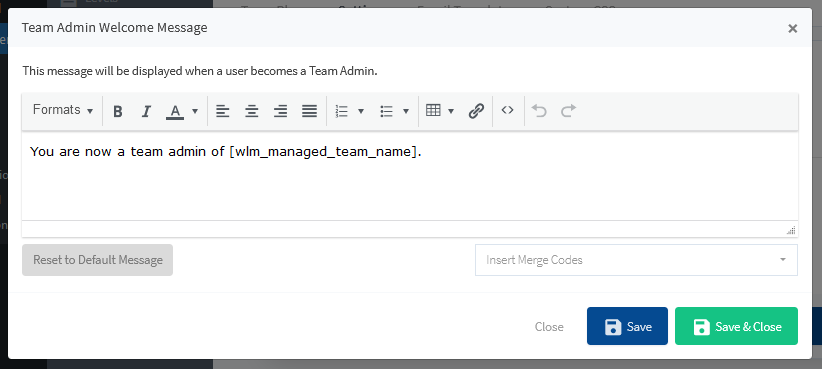
The screenshot below shows the edit options in the popup for the Team Admin Welcome Message.
—
Team Admin Welcome Message. This message will be displayed when a user becomes a Team Admin. The default message includes a shortcode that will display the Managed Team name when viewed by the Team Admin.
Shortcode included in default message: [wlm_managed_team_name]
—
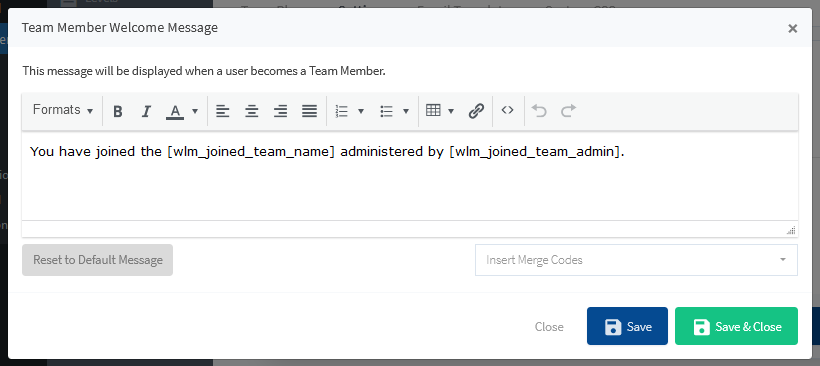
The screenshot below shows the edit options in the popup for the Team Member Welcome Message.
—
Team Member Welcome Message. This message will be displayed when a user becomes a Team Member. The default message includes a shortcode that will display the name of the joined Team Plan and a shortcode that will display the name of the Team Admin that manages the joined Team Plan.
Shortcode included in default message: [wlm_joined_team_name]
Shortcode included in default message: [wlm_joined_team_admin]
Team Accounts – Email Templates
The Team Invite email is sent to a user when they are added as a Team Member. When a Team Admin adds a Team Member to one of their Team Plans, the Team Invite is sent and it includes a link the user can click to accept the invitation.
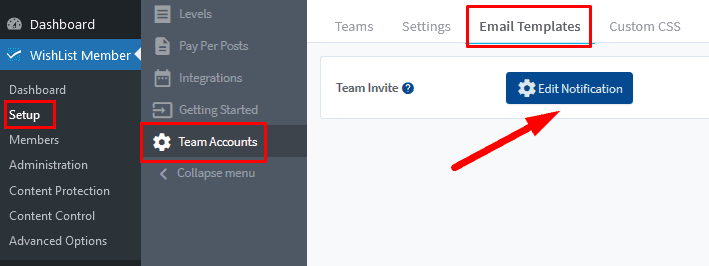
You can edit the content of this email in the Setup > Team Accounts > Email Templates section of WishList Member. The Edit Notification button can be used to view and adjust the content of the email and who is set as the email sender.
—
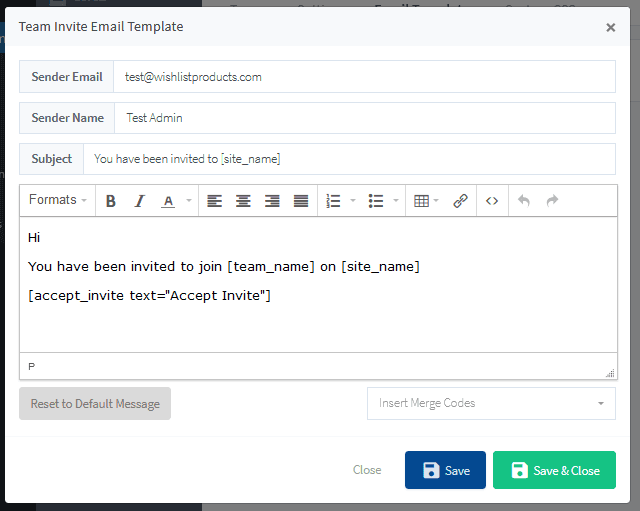
The Team Invite Email Template popup appears and you can view the Sender Email Sender Name, Subject and body of the email. The default settings can be used or you can customize the email and include any information you would like added.
—
The following mergecodes are inserted into the default email subject and messages:
[site_name] The name of the WordPress site will be automatically displayed in the subject and email.
[team_name] The name of the Team Plan will be automatically displayed in the email.
[accept_invite text=”Accept Invite”] A text link stating “Accept Invite” will be displayed in the email. This link can be clicked by the user and they will become a Team Member with an active status for the Team Plan.
—
User Accepting Invite and Becoming a Member
Below is an example of how that Invite email will appear in the inbox of an invited user.

—
The shortcodes have been replaced with the corresponding information and the user can click to accept the invitation and become a Team Member.

—
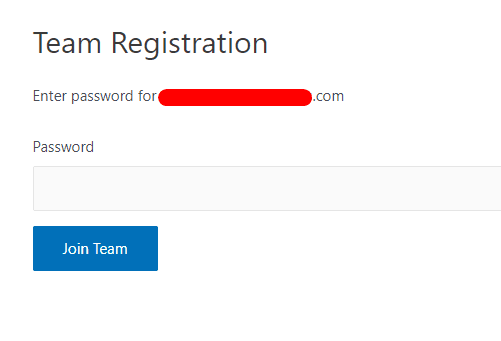
The example screenshot below shows what an existing member who clicked the Accept Invite link will see. Since they already have an account, they can login to join the Team Plan. If they were not an existing member, they would simply fill in the registration form that would appear to set a password and become a member of the team.
Team Accounts – Custom CSS
You have the option of adding custom CSS to control the appearance of the Team Management page. This means you can add your own CSS to adjust the look and feel of that page.
If you decide to enable this option and work with the CSS code and then decide you want to restore the original CSS, a Reset to Default button is available.

—
There are many possibilities when using Team Accounts to manage members. This allows you to provide selected members with the power to create and manage their own teams.
