
Accepting member registrations is vital for a membership site. The process should be quick and easy for the user to ensure they gain access as soon as possible. There are a few available options when it comes to registration forms in WishList Member so we'll jump right into those below.
WishList Member includes a standard registration form and it is typically used to allow users to join your membership. You can accept free registrations or you can require payment before a user can register.
There is also an option for you to include additional fields using the custom registration form option. A couple examples of extra information to collect could be adding a field that asks the user how they heard about your site or a field requesting additional information like a phone number.
You can request any information you would like during the registration process. That being said, users often appreciate a shorter registration form. Less fields to fill in can often lead to more registrations since the process is quicker and easier.
More details on Registration Settings, Registration Form Styles and Custom Registration Forms are included below (including a Video Tutorial).
—
Registrations
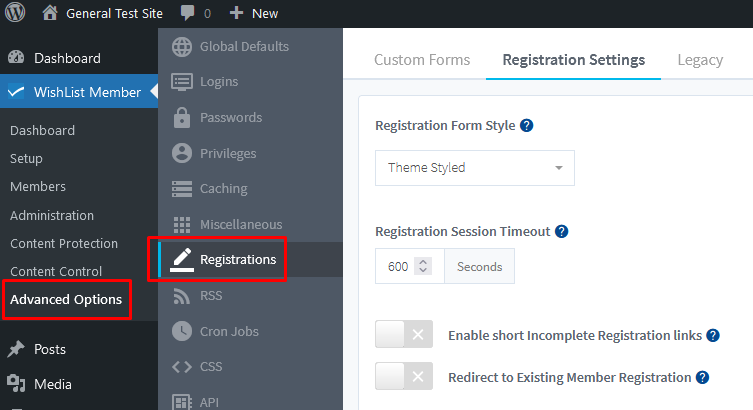
The general settings for registrations can be found in the Advanced Options > Registrations > Registration Settings section of WishList Member.
—
Note: If you are looking for more information on adding a registration form to a page, accepting payments for registration, free registrations, etc. we recommend also checking out the Registrations – Options article. It covers these topics in more detail.
—
Registration Settings
There are a few settings that can be configured and applied to any registrations. The default settings will work for most cases, but you can edit these as needed. Each of these settings are explained below.

—
Registration Form Styles
Registration Form Style. The appearance of the WishList Member registration form can be set based on three available options. You can select the option that best suits your site.
- Theme Styled. The appearance of the registration form will be based on the applied WordPress theme. This means it may pull elements from the specific theme styling. This could include boxes around the fields, color palette, etc.
A screenshot example of a Theme Styled registration form is displayed below.

—
- WishList Member Styled. The appearance of the registration form will be based on the WishList Member registration form. This means it will not pull elements from the specific theme styling.
A screenshot example of a WishList Member Styled registration form is displayed below.

—
- Legacy. The appearance of the registration form will be based on an older style of WishList Member registration form. This style is not often used, but is available mostly for those who have used it in the past and may want to continue using it.
A screenshot example of a Legacy Styled registration form is displayed below.

—
Registration Session Timeout. The set time a user has to complete the registration form. The default length is set at 600 seconds (10 minutes). If a user takes longer to complete the registration, an incomplete registration will be available in the Members > Manage Members section of WishList Member. An incomplete registration can be completed by the user or the site admin.
Enable short Incomplete Registration links. If enabled, the incomplete registration link is automatically shortened. The incomplete registration link is created if a user doesn’t finish a registration. The incomplete registration link appears in the Incomplete Registration email that is sent to users if the user doesn't complete the registration.
Note: The Incomplete Registration email can be found in the Advanced Options > Global Defaults > Email section of WishList Member.
Redirect to Existing Member Registration. If enabled, the user will automatically be shown the Existing Member login option on the registration form if the email address used to pay is already tied to an existing member in WishList Member. This setting only applies to registration for a membership level that has been integrated with a payment provider and if the user has previously registered for any other membership levels.
This means if the membership level has been integrated with a payment provider in WishList Member and an existing member purchases access to another membership level using the same email address, they will be shown the Existing Member login option to complete their registration. They would login with their existing member account after payment to gain access to the additional membership level.
—
More details (including a Video Tutorial) are available in the Registration Form Style article.
—
Custom Registration Forms
A custom registration form can be created to request and collect additional information during the registration process. This is accomplished using the available fields, radio buttons, etc. that can be added.
Once you create a custom registration form, you can apply it to any membership level(s). Then anyone who wants to register for a level using that custom form would need to fill in the additional information.
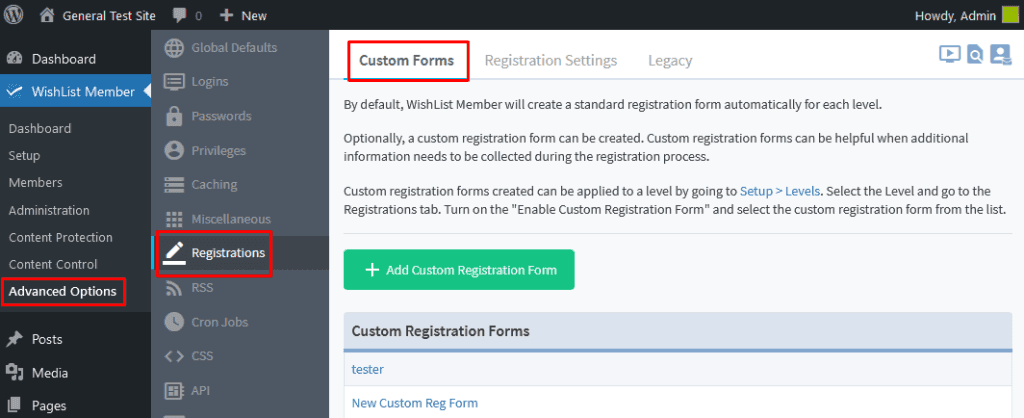
You can create or edit a custom registration form in the Advanced Options > Registrations > Custom Forms section of WishList Member.
—
You can start by clicking the “Add Custom Registration Form” button.

—
The Form Name section will appear. You can fill in the name of the form and click the Apply button. The name of the form is for admin purposes and will not be seen by members.

—
The section to add fields will appear and you can drag and drop any fields you would like onto the custom registration form.
The fields will appear on the form in the order you place them. You can drag and drop them into the order you want at any time.
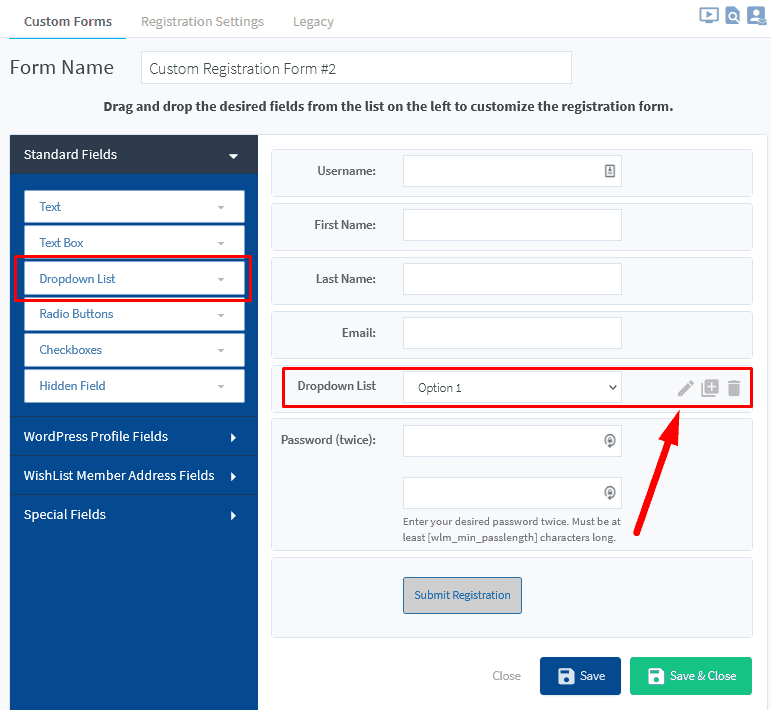
The screenshot example below shows a custom registration form named “Custom Registration Form #2” with the default fields. No additional fields have been applied yet.
Note: The [wlm_min_password_length] shortcode will automatically show the number set as the minimum length for a password. The default minimum character length for a password is 8.

—
Custom Field Types
There are four types of fields that can be added to the custom registration form. These appear in the left side column and you can select any you would like to include on the registration form. Additional information on each one is available below.
Standard Fields. A standard field is a typical field you would see on an online form. Examples include a Text, Text Box, Dropdown List, Radio Button, Checkbox, and Hidden Field.
As an example, a dropdown list could be used to display a list of items the user can make a selection (or multiple selections) from. Or you could use a checkbox to ask a question. It could ask if the user has already completed previously required certification.

—
WordPress Profile Fields. A WordPress field is a field related to a WordPress user account. WishList Member creates member accounts based on a WordPress user account. This means you can include fields requesting information that can be displayed in the WordPress user account. Examples include a First Name, Last Name, Nickname, Website, AIM, Yahoo IM, Jabber / Google Talk, and Biographical Info.
You may be interested in requesting the URL of their website or finding out their nickname.

—
WishList Member Address Fields. A WishList Member address field is a field related to the physical address of the user. This means you can include fields requesting address information that can be displayed in the member account in the Members > Manage Members section of WishList Member. Examples include a Company, Address (First Line), Address (Second Line), City / Town, State / Province, Zip / Postal Code, and Country.
These types of fields are useful if you have anything physical you might be mailing out to users. Sending items like a pamphlet or a welcome gift are ways to go above and beyond when users register.

—
Special Fields. A special field is a field related to something more involved than standard fields. Examples include a Terms of Service, Section Header, and Paragraph Text.
You may want to separate sections of the form and the section header can help with that. There is also an option to include a Terms of Service with a quick drag and drop.

—
Custom Registration – Custom Field Example
In this example, we are going to add a dropdown field with three options. This allows the user to select from the provided list of options for a question on the form.
The screenshot below shows a custom registration form with the Dropdown field dragged and dropped into it.
The edit icon can be clicked and this is where you can really get creative.
—
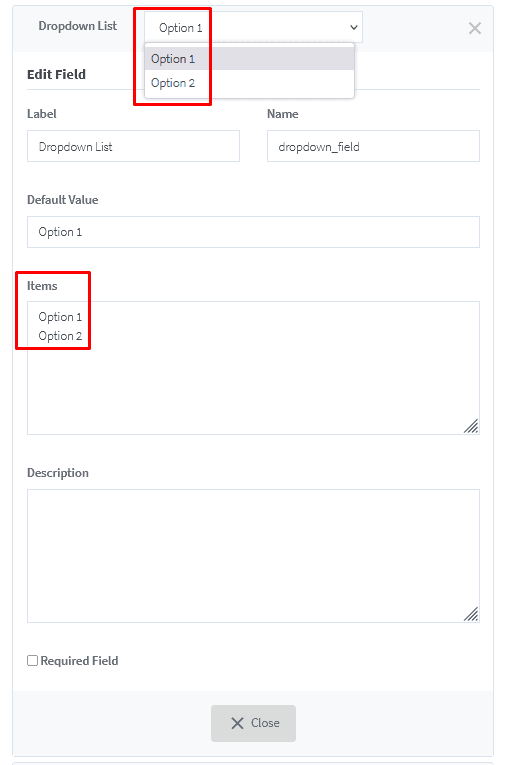
After clicking to edit, you'll see the available options. Since this is a dropdown list, there are default options that appears in the dropdown that correspond with the list of Items. You can create a list of Items and the Dropdown List will display them in the same order automatically.
Note: You will need to click the Save or Save & Close button on the bottom of the form once you make your changes.
—

—
We are going to set the Items as the following:
- My favorite color is red.
- My favorite color is blue.
- My favorite color is green.
—
You'll notice changing the Items list also updates the Dropdown List to match when the Save button is clicked..

—
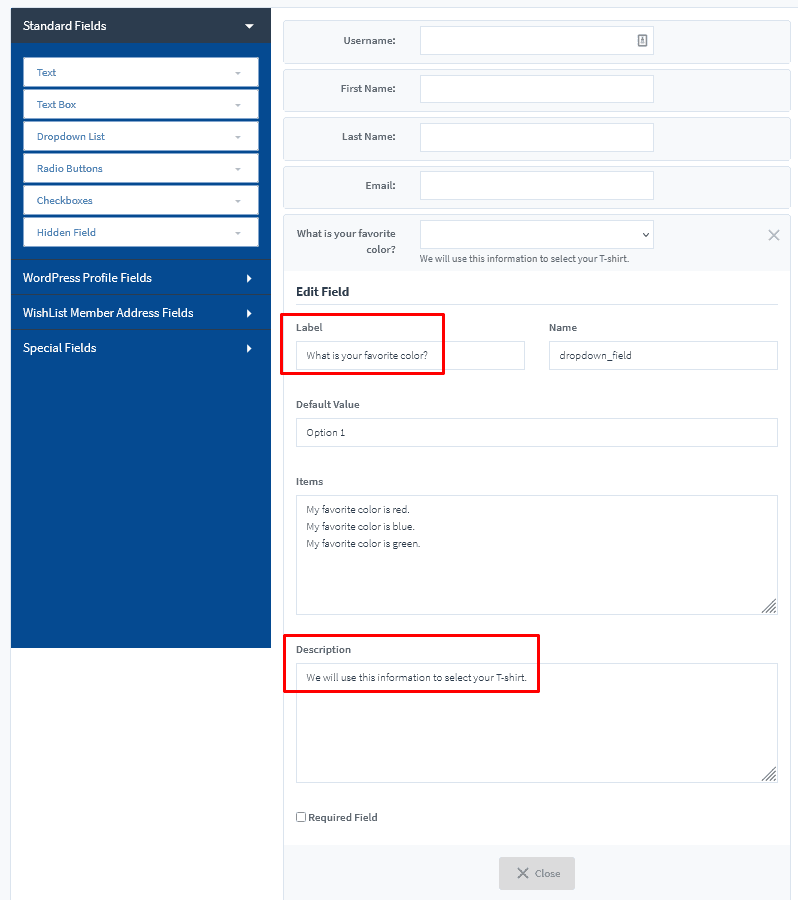
Each type of field has its own set of options. In the case of a dropdown, you can also set the following:
Label. The label will appear above the field on the registration form. This is often set as a question or a directive. A couple examples would be asking: What is your favorite color? Or stating: Please select from the following.
Name. The name is not displayed to the user on the site. The name is used to store the data.
Default Value. The default value is set to Option 1. That will display the first item from the Items list. This can be changed to match anything from the Items list.
Items. Each item separated by a line break will appear as a selection in the dropdown.
Description. The description will appear below the field on the registration form. This can be left blank or you can include a description of what is being requested in the field.
Required Field. If enabled, the field must be filled out in order to complete the registration.
—
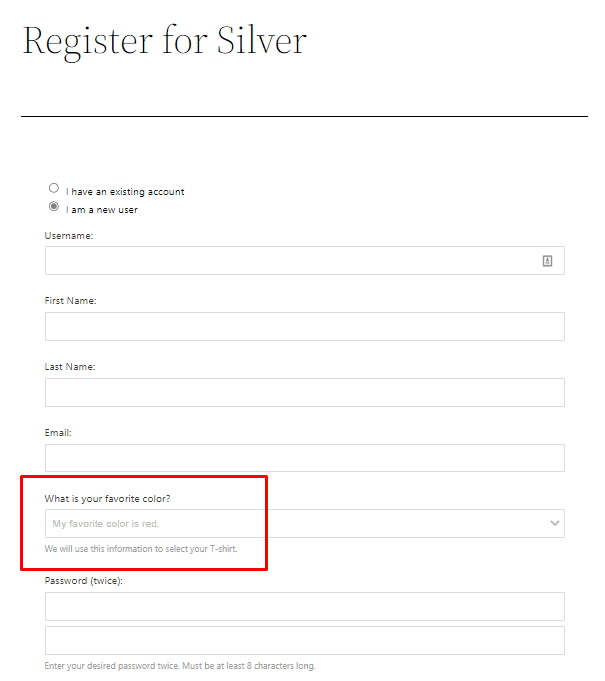
In this example, the dropdown is set with a label of “What is your favorite color?” and a description stating “We will use this information to select your T-shirt”. The dropdown is not set to be a required field and the default value is Option 1.
—
Below is a screenshot example of how that dropdown field appears on the custom registration form.
—
Apply a Custom Registration Form to a Level
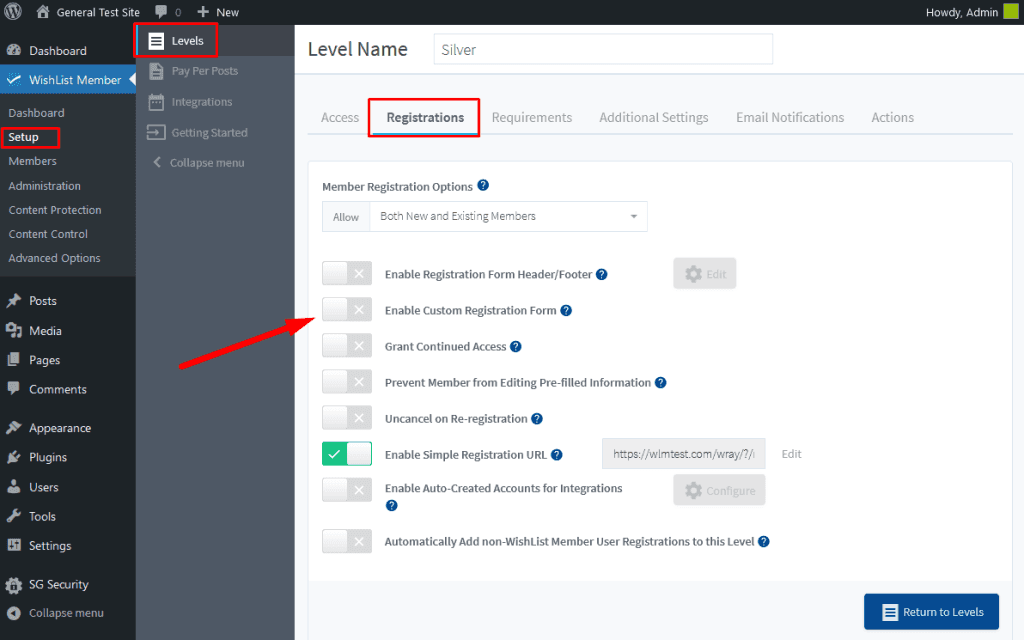
Once you create a Custom Registration Form, you can apply it to a membership level.
This is a quick process and can be done in the Setup > Levels > *Click on Level Name* > Registrations section of WishList Member.
—
Once you “Enable Custom Registration Form”, a dropdown will appear and you can select the custom registration form from the list. The example below shows the Custom Registration Form #2 option.

—
Selecting the custom registration form will apply it to the membership level. Anyone registering for this level will now use the set custom registration form.

—
Viewing Custom Fields Entered by a User
You can see the information a user entered into a registration form in the Members > Manage Members > *Click to Edit User* section in WishList Member.

—
The Edit Member popup will appear and you can view any filled in custom field in the Other Fields tab.
The example screenshot below shows the user selected “My favorite color is blue” when they filled in the custom registration form.

—
