
WishList Member includes an integration with Infusionsoft by Keap. This allows you to automatically provide access to a member in WishList Member if they purchase through an Infusionsoft by Keap powered order form. This means you can automatically provide a user with access to members-only content once their payment is successful.
All the details are explained below (including examples and screenshots).
Enable Infusionsoft by Keap Integration
You can select and enable the Infusionsoft by Keap option in the Setup > Integrations > Payment Provides section of WishList Member.

—

—
The Settings tab will appear and the API Status will show as “Not Configured”. This is because WishList Member and Infusionsoft by Keap need to be connected. This quick connection process is explained below.
Connect WishList Member and Infusionsoft by Keap Integration
Click the blue Connect to Infusionsoft by Keap button.

—
You will be directed to the Infusionsoft by Keap site and can login to the Infusionsoft by Keap account you want to connect with WishList Member.

—
Once you are logged in to the Infusionsoft by Keap account, you will be directed to the form to connect with WishList Member. Click the Allow button to confirm the connection.

—
Once you click the Allow button, you will be directed back to WishList Member and the API Status will show as “Connected”. The Infusionsoft by Keap account is now connected with WishList Member.

—
WishList Member and Infusionsoft by Keap are now connected and the integration process can continue.
Integrate Infusionsoft by Keap Products with WishList Member
You can create products in Infusionsoft by Keap and those products can be integrated with corresponding membership levels in WishList Member. This allows you to create a product in Infusionsoft by Keap and anyone who purchases that product will be assigned to the membership level you select in WishList Member.
The Products tab displays all the membership levels in WishList Member and a corresponding SKU for each level.

—
The first step is creating a product in Infusionsoft by Keap. You also have the option of integrating an existing Infusionsoft by Keap product with WishList Member if you have one.
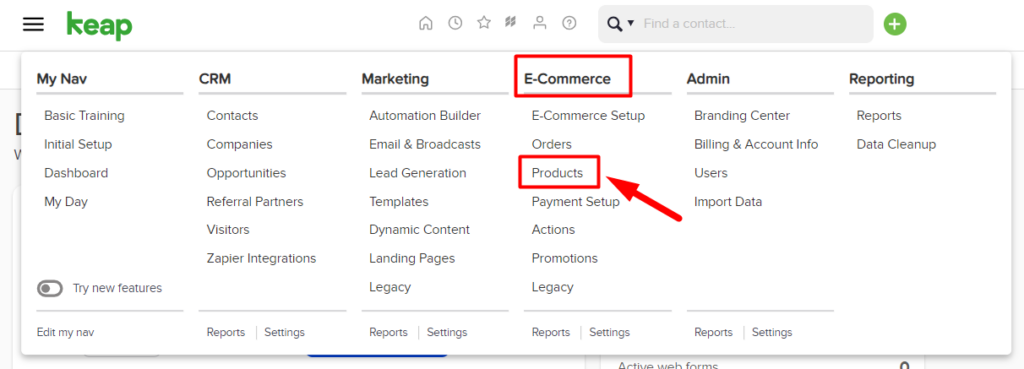
Products can be viewed or created in the E-Commerce > Products section of Infusionsoft by Keap.
—
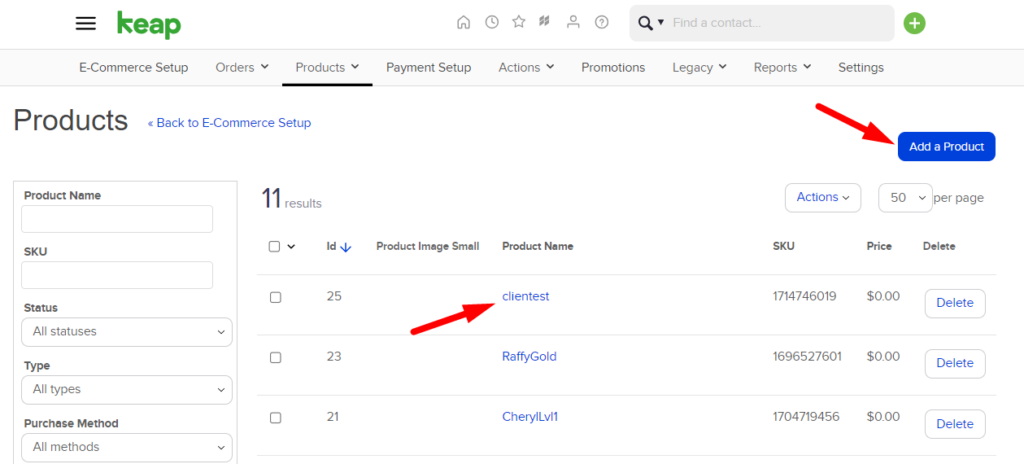
The Products section appears and you can view a product or create a product in Infusionsoft by Keap based on your preferences. This means you can set what you would like as the price, subscription length, etc.
Click the Add a Product button to create a new product or click an existing product name to edit that plan.
—
In this example, the Add a Product button has been clicked. The Add a Product popup appears and you can give the product a Name and a product Type. (The product type can be either Product or Digital). In this case, the product is named Platinum Membership and the product type is set as Digital.
Click the Save button once the fields are filled in.

—
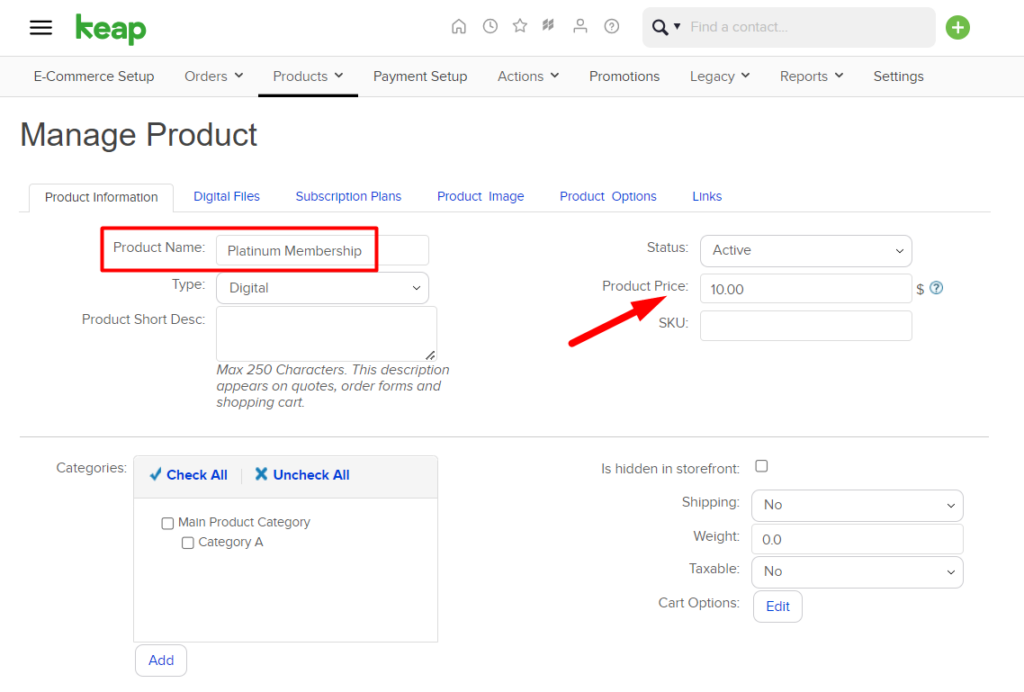
The Manage Product section appears and the new product has now been created in Infusionsoft by Keap. You can set the price of the product in the Product Price field. The example screenshot below shows a price of $10.
—
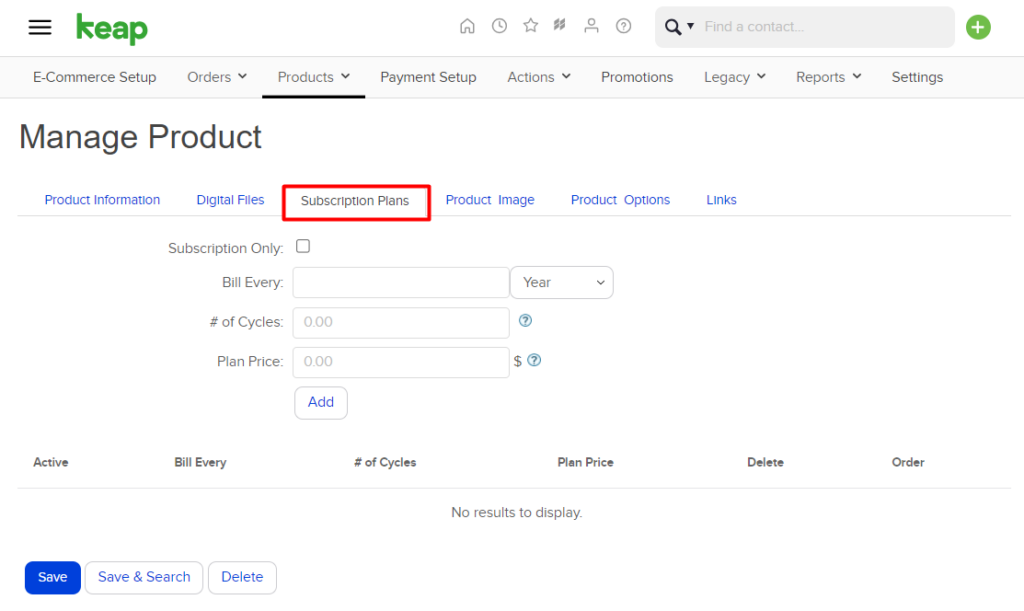
You have the option of setting the product to be a subscription plan if your membership will be a recurring priced plan. This can be set in the Subscription Plans section of the product. You can set the payment schedule, frequency of recurring payments, subscription plan price, etc.
—
Your product can be configured how you would like in Infusionsoft by Keap but it needs to include the specific membership level SKU from WishList Member to be pasted into the corresponding field in Infusionsoft by Keap.
Copy the specific membership level SKU in the Setup > Integrations > Payment Providers > Infusionsoft by Keap > Products section of WishList Member. The screenshot example below shows the SKU for the Platinum level.

—
Then paste the SKU into the SKU field in the Products > Product Information section of the product in Infusionsoft by Keap.
Once the SKU has been added and your product is set up according to your preferences, click the Save button.

—
The product in Infusionsoft by Keap is now connected to the membership level in WishList Member using the SKU. The next step is creating an order form in Infusionsoft by Keap.
Sell the Product (with Connected Membership Level)
Now that you have created the product in Infusionsoft by Keap and integrated it with the corresponding membership level in WishList Member, you can sell access to the membership level through an order form created in Infusionsoft by Keap.
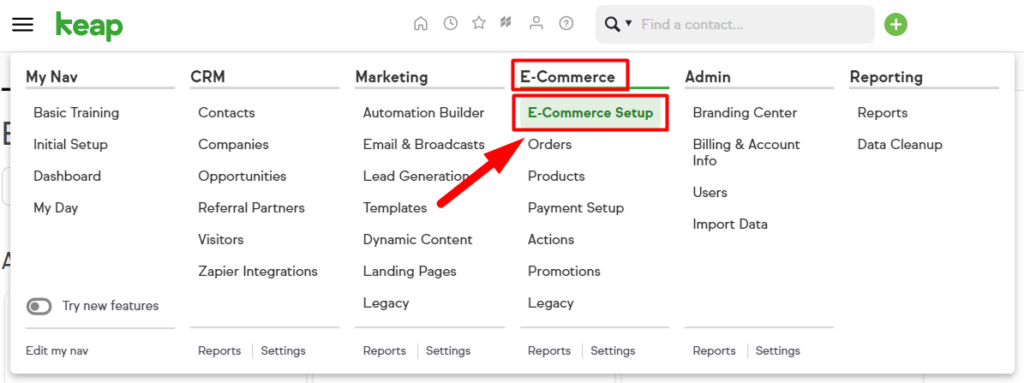
An order form can be created in the E-Commerce > E-Commerce Setup section in Infusionsoft by Keap.
—
The E-Commerce section will appear. Select the “Create an order form” option from the Quick Actions dropdown or click the “Order Forms” option in the Sell Online section. (Both will take you to the same Order Forms section).

—
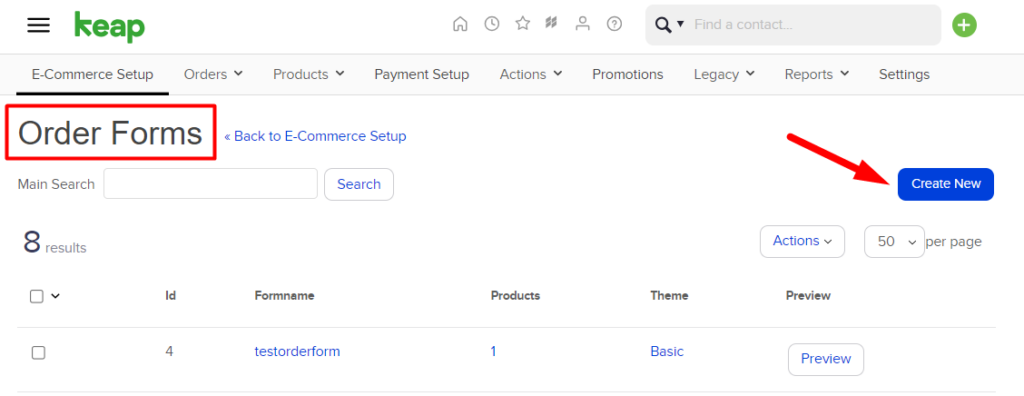
The Order Forms section appears. Click the Create New button.
—
The Add Order Form popup appears. Enter the name of your form into the corresponding field and click the Save button. The screenshot example below shows the name “My Form”.

—
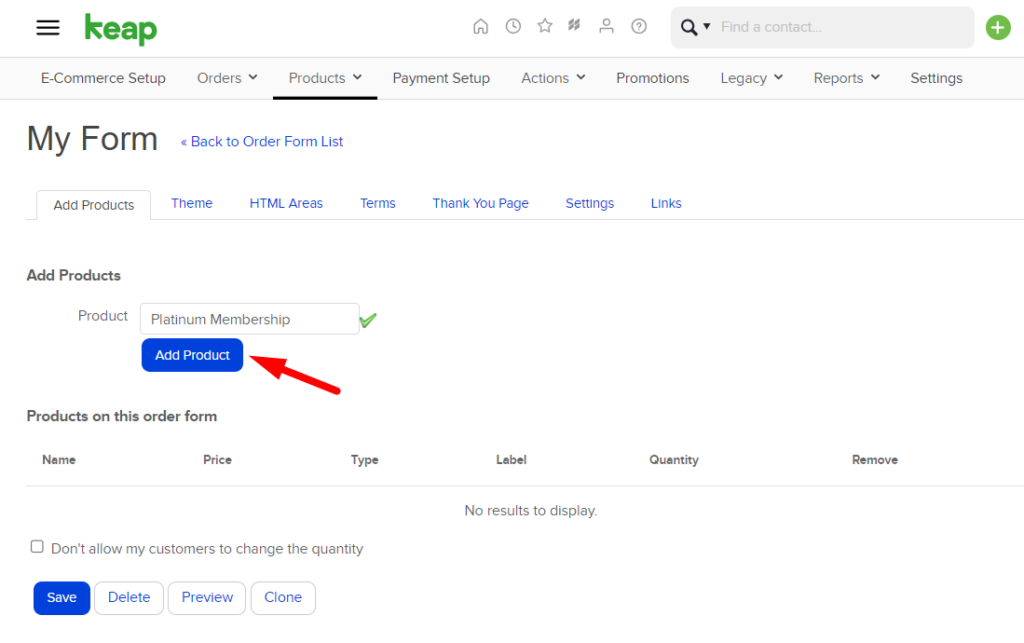
Your new Order Form will be saved and the additional settings for the form will appear in the Add Products tab. The next step is to add your product to the Order Form by selecting the product from the Product dropdown. The screenshot example below shows the Platinum Membership product selected.

—
Click the Add Product button to add the selected product to the Order Form.
—
The added product appears in the “Products on this order form section”. Click the Save button.

—
The product has now been added to the Order Form.
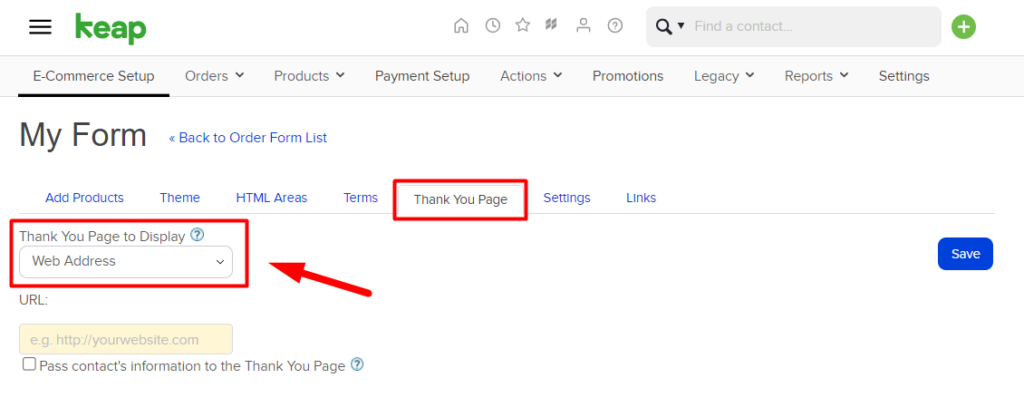
Next, click the Thank You Page tab and select Web Address from the Thank You Page to Display dropdown.
—
The URL field below the Thank You Page to Display dropdown will be filled with a URL from WishList Member. Copy the Order Form Web Page URL in the Setup > Integrations > Payment Providers > Infusionsoft by Keap > Settings section of WishList Member.

—
Then paste that URL into the URL field below the Thank You Page to Display dropdown in Infusionsoft by Keap and check the “Pass contact's information to the Thank You Page” checkbox. Click the Save button once these options are configured.

—
Your order form is now created and you can add that form to your site to allow members to purchase access to the corresponding membership.
Add an Order Form to Your Site
You will find the Order Form URL for your Order Form in the Links section of the product in Infusionsoft by Keap. The Order Form URL can be added to a button you create or used as a text link anywhere on your site and will direct users to the order form when they click it.
Once a user clicks the text link/button, they will be able to purchase and register for the corresponding membership level.

—
Users Can Purchase and Register to Gain Access
The screenshot example below shows the order form that will appear when the order link is used.

—
Once a user fills in that order form and pays, they will be directed to the registration form to create their member account.

—
The user submits the registrations form and they will be added to the corresponding membership level in WishList Member and can access any of the protected content assigned to that membership level.
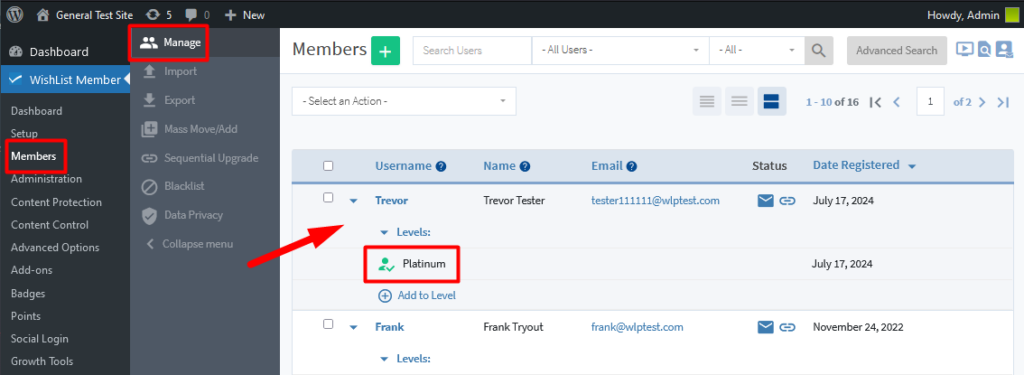
The screenshot example below shows the user has been added to the Platinum membership level in WishList Member after they paid through the Order Form and submitted the registration form.
—
