Can your members pay with Apple Pay or Google Pay? Yes. The Stripe integration with WishList Member includes an option to send buyers to the Stripe Checkout page to pay. Apple Pay and Google Pay are available on that page alongside card payments. This article explains how to turn on Stripe Checkout and what your members will see.
You can access this setting in the Setup > Integrations > Payment Providers > Stripe section of WishList Member. Stripe Checkout is available in WishList Member version 3.36.1 and higher. The behavior described in this article requires version 3.37.1 or higher.
—
How Stripe Checkout Works
By default, the Stripe payment form collects the buyer’s card details directly on your site. When Stripe Checkout is turned on, the payment form shows an order summary and a Proceed to Checkout button instead. The buyer is sent to a secure page hosted by Stripe to finish the payment.
On the Stripe Checkout page, the buyer can pay by card, Apple Pay, or Google Pay. Stripe also collects the buyer’s personal details, any promotion code, and any applicable tax on that page. After the payment is complete, the buyer is sent back to your site and added to the membership level.
Stripe Checkout works with both recurring Stripe plans and one-time payments. It applies to the popup payment form and the on-page payment form.
—
Enable Stripe Checkout
Your Stripe integration needs to be connected before you turn on Stripe Checkout. If you haven’t connected it yet, follow the steps in the Stripe Integration with WishList Member article first.
- Navigate to the Setup > Integrations > Payment Providers > Stripe section of WishList Member.
- Click the Configure button and select the Settings tab.
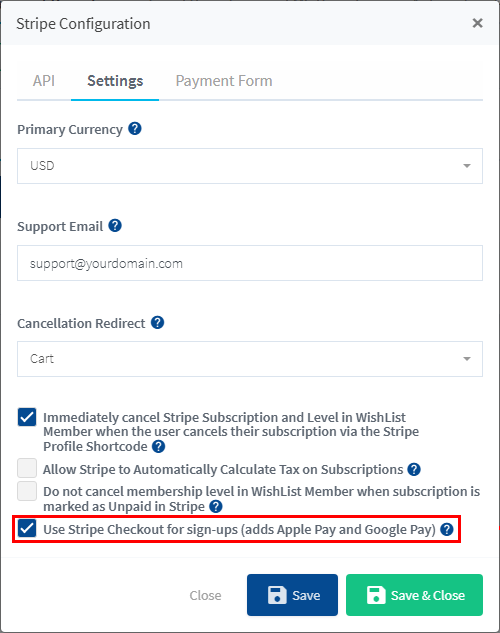
- Check the Use Stripe Checkout for sign-ups (adds Apple Pay and Google Pay) checkbox.
- Click Save & Close.
The screenshot example below shows the Use Stripe Checkout for sign-ups (adds Apple Pay and Google Pay) setting in the Settings tab.
—
Your site must be served over HTTPS to use Stripe Checkout. To go back to the on-page card form, uncheck the same setting and click Save & Close.
If a “Stripe Checkout is enabled but the Stripe integration setup is incomplete” notice appears in WishList Member, sign-ups will still use the on-page card form. Open the Stripe configuration and click Save & Close to complete the setup.
—
What Your Members See
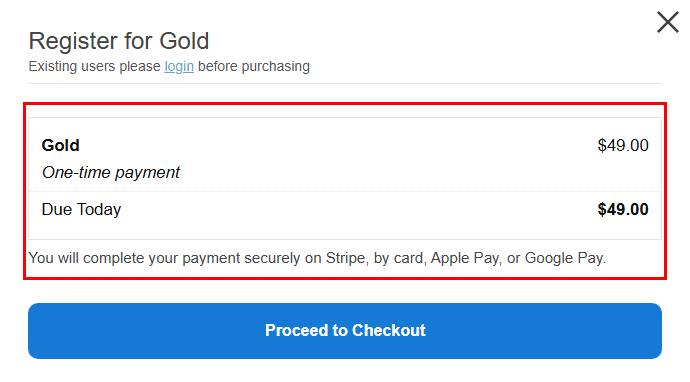
With Stripe Checkout turned on, the payment form shows an order summary for the membership level. The screenshot example below shows the payment form for a membership level named Gold.
—
The order summary includes the following:
- Payment Plan. Appears only when more than one Stripe plan is set for the membership level. The summary updates when the buyer selects a different plan.
- Price. The membership level name, the price, and the billing cycle. One-time payments show as “One-time payment.”
- Free Trial. Appears when the Stripe plan includes a free trial.
- Due Today. The amount the buyer will pay today.
A short message below the summary tells the buyer they will complete the payment on Stripe by card, Apple Pay, or Google Pay. When promotion codes are available on the form, it also tells them they can enter one there.
The button on the form reads Proceed to Checkout when the Panel Button Label is blank or set to the default Pay. If you set your own label there, or a custom Pay Button Label in the shortcode, that label is used instead. You can change the Panel Button Label in the Payment Form tab, as explained in the Stripe Integration with WishList Member – Edit Payment Form article.
—
The Stripe Checkout Page
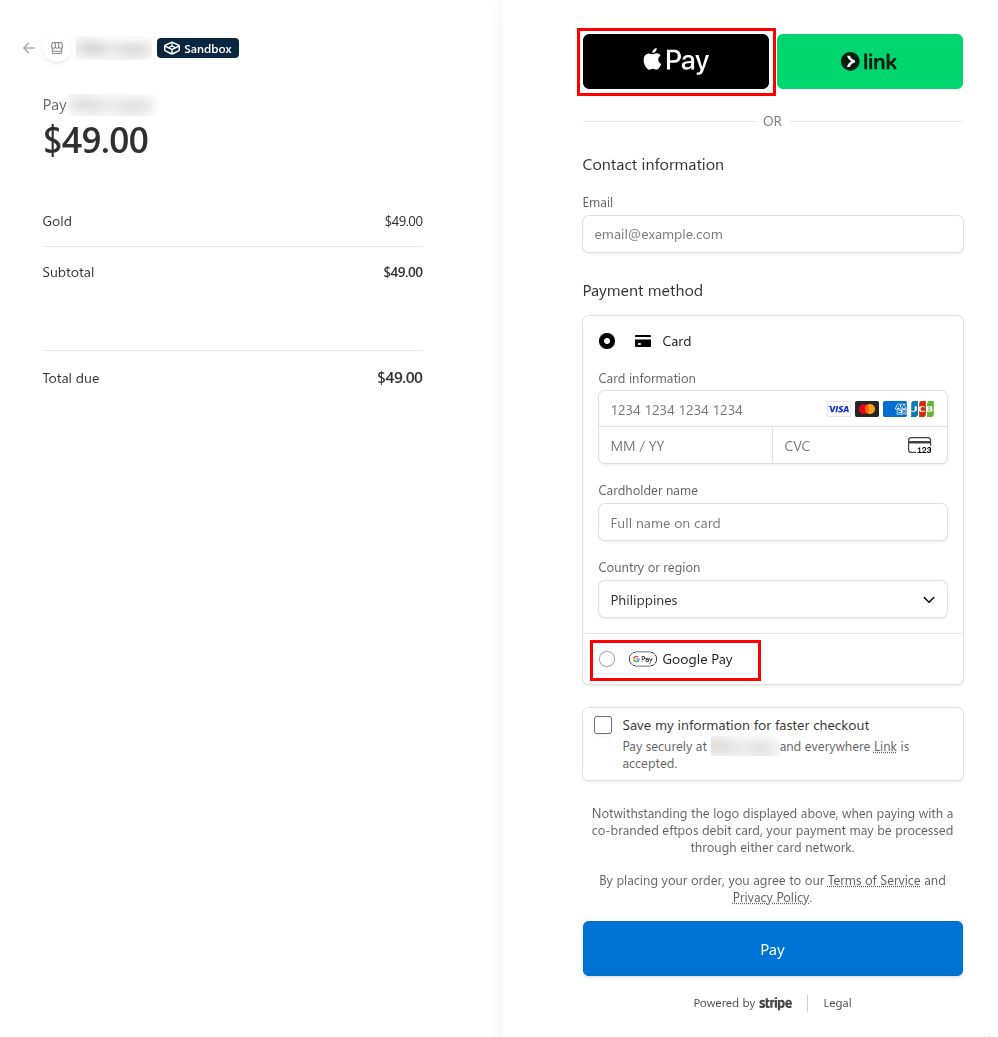
When the buyer clicks Proceed to Checkout, they are sent to the Stripe Checkout page. The screenshot example below shows the Stripe Checkout page for the Gold level. Apple Pay appears at the top, and Google Pay appears in the payment method list below Card.
—
After the payment is complete, the buyer is sent back to your site:
- New buyers are sent to the registration page to choose a username and password, the same as with the on-page card form.
- Logged-in members are sent to the after registration page for the membership level.
—
Coupons and Promotion Codes
With Stripe Checkout turned on, buyers enter promotion codes on the Stripe Checkout page, not on your site. Coupons must be set up as Stripe promotion codes. A Stripe coupon ID on its own is not accepted on the Stripe Checkout page.
The Add promotion code option appears on the Stripe Checkout page only when Enable Coupon Code is set to Yes in the shortcode. It applies to recurring Stripe plans only and does not appear for one-time payments.
The steps to create a promotion code are covered in the Stripe Integration with WishList Member – Create Coupons and Accept Promo Codes article.
—
Tax
If Allow Stripe to Automatically Calculate Tax on Subscriptions is checked in the Settings tab, Stripe calculates tax for recurring Stripe plans on the Stripe Checkout page. The buyer is asked for a billing address there, and the payment form tells them that any applicable tax is added on the next step.
—
Prorated Plan Changes
Stripe Checkout is used for new purchases. If a membership level allows proration, a logged-in member with an active Stripe subscription can still change an existing plan. The member sees two options on the payment form:
- Change an Existing Plan. Changes the member’s current subscription to the new membership level on your site. The prorated difference is charged today. The member can use the card on file or choose Use a different card (you will enter it on Stripe) to enter a new card on a Stripe page.
- Buy Level as New Plan. Sends the member to the Stripe Checkout page to buy the membership level as a separate plan. The member’s existing plan stays active.
The Stripe Integration with WishList Member – Upgrade or Downgrade Members with Prorated Payments article explains how to set up proration for a membership level.