
WishList Member includes an integration with Thrive Architect. The combination of WishList Member and Thrive Architect gives you the ability to select different elements within a page or post and only allow specific users to access it.
You can use this powerful option to control access to various sections within a page or post.
Content can be set to only be viewable by specific membership levels. You can also set content to only be viewed by members who are not in a selected level.
This means a page can appear one way to some members and can appear another way to others. There are a number of options when using the variety of elements in Thrive Architect and the WishList Member integration provides the ability to customize how those elements appear (and who is able to see them).
You can set a text element to display a members only message and ensure only those with access can see it. Those who cannot see it will also see the alternative text you can set.
These are only a few examples with many more possibilities available. Lets get into it more below.
—
Installing Thrive Architect
The first step towards using WishList Member and Thrive Architect is installing the Thrive Architect plugin. This can be done in the Plugins > Add New > Upload Plugin section of WordPress.
Note: You will need to have downloaded the Thrive Product Manager plugin to your computer first. If you own Thrive Apprentice, it will be available to you within the Thrive Product Manager plugin.
More details on the installation process are available in the How to Use the Thrive Product Manager article on the Thrive Themes site.
Once you have downloaded the Thrive Product Manager plugin, you can upload and activate it on your site.

—

—
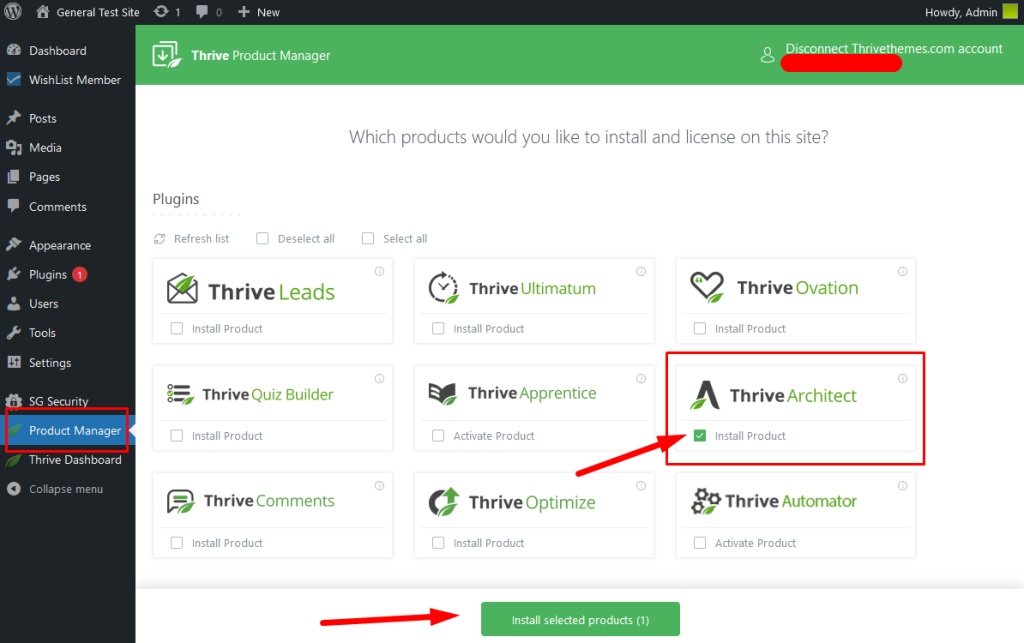
Then select Thrive Architect in the Product Manager section and click the “Install selected products” button.
—
Thrive Architect is now installed and activated.

—
Note: The Thrive Architect integration will be automatically enabled in the Setup > Integrations > Other Services section of WishList Member. There are no additional settings within WishList Member.
WishList Member Conditional Display
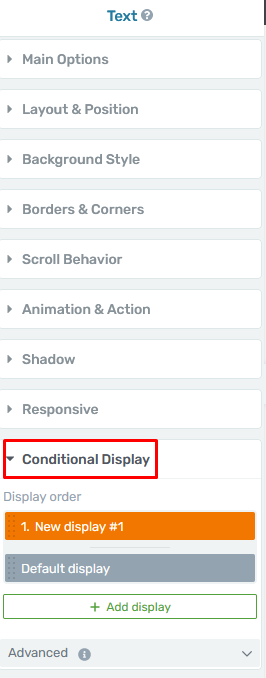
While the integration is enabled, WishList Member will add a setting within Thrive Architect related to the display of Thrive Architect elements.
The setting can be accessed when using the Conditional Display while editing an element in Thrive Architect.
—
Setting Protection and Access for Elements
The WishList Member options appear when using the Display Conditions section of the element in Thrive Architect.
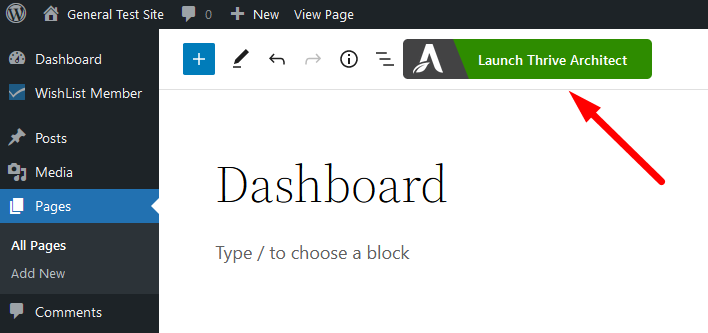
You can use the “Launch Thrive Architect” button when editing a page or post to set protection and access for elements using WishList Member.
—
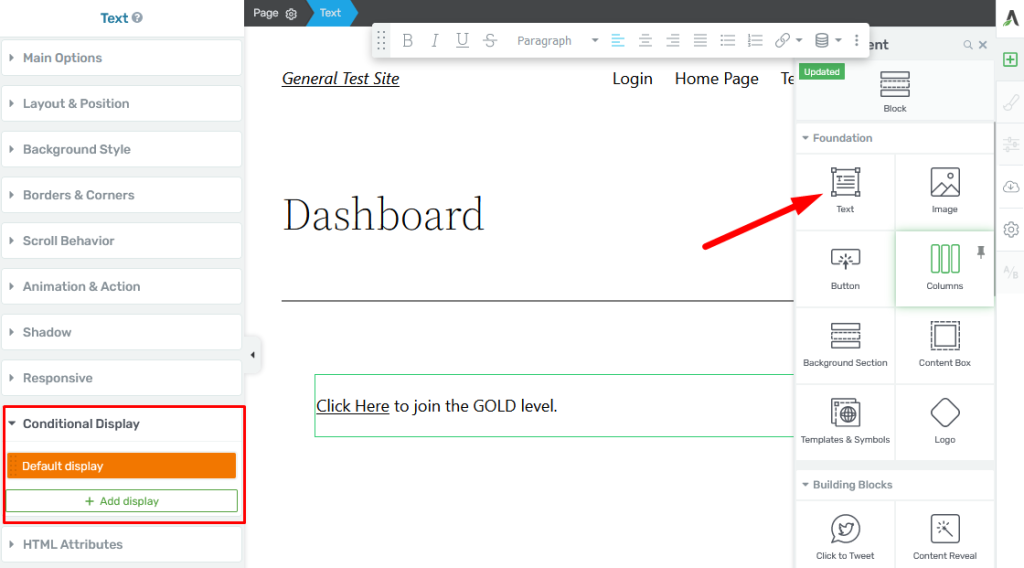
In the example below, we will be setting a text element to only be seen by Gold Members. Anyone else will see a message stating they can “Click Here to join the GOLD level”.
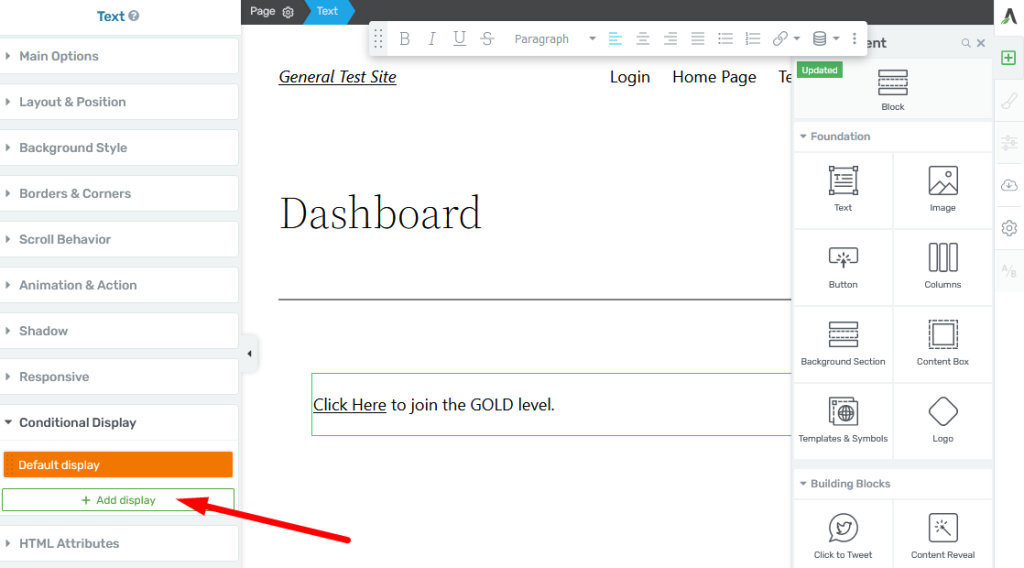
We have inserted a Text element into the page and have clicked on the Conditional Display option in the left column.
—
Click on the Add display button. This will allow us to create the content that will only been seen by members.
—
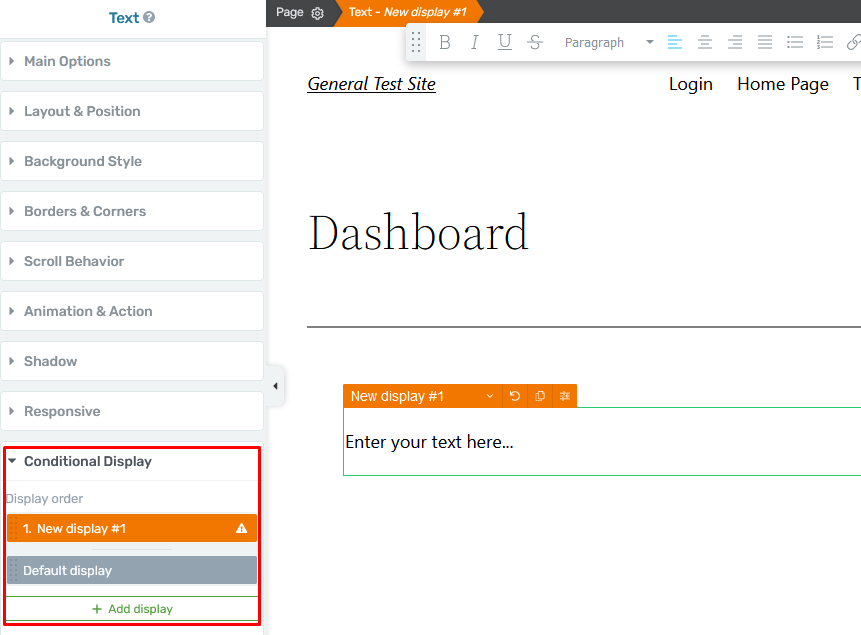
There are now two display types shown:
New display #1. This display can be edited to only be seen by selected membership levels. (The name of the display can be edited. It is recommended to use a name that describes the display).
Default display. This display will be seen by anyone not defined in the New display #1.
—
We have set the Default display to show “Click Here to join the GOLD level”. That takes care of the default message that will appear on the page.
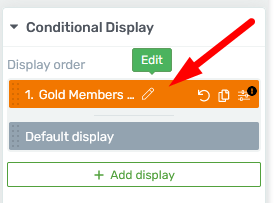
We can click the pencil icon on the New display #1 to edit the name of that display. We have set the name to Gold Members Only.
Note: The name will not be seen on the live site. It is only used for admin purposes in Thrive Architect.
—
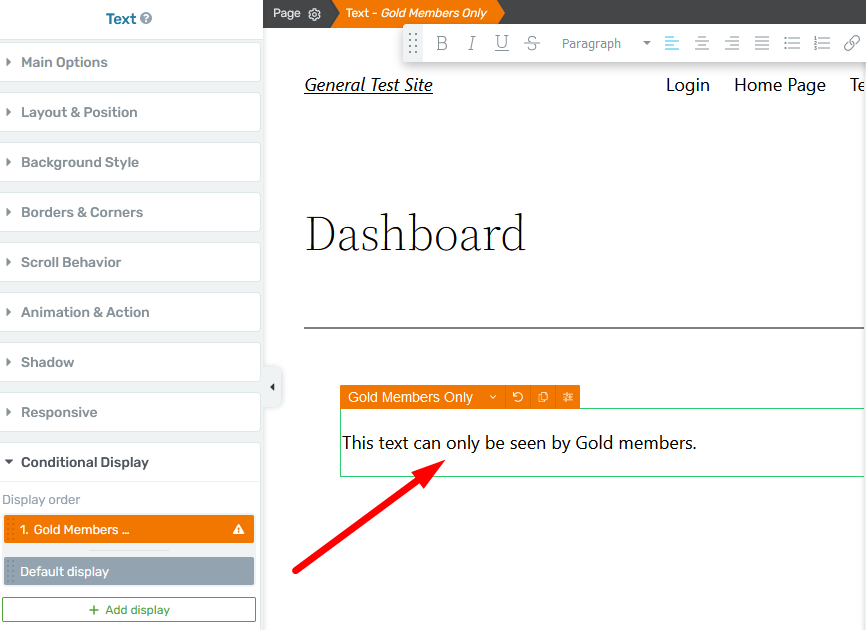
The content for Gold members can now be entered into the element. In this case, it states “This text can only be seen by Gold members”.
—
The next step is important as it controls who can see the new display text we just created. We only want Gold members to see it so we need to click the settings icon on the right side of the display in the Conditional Display section or on the element itself.
Either option will open the display settings for that condition.

—
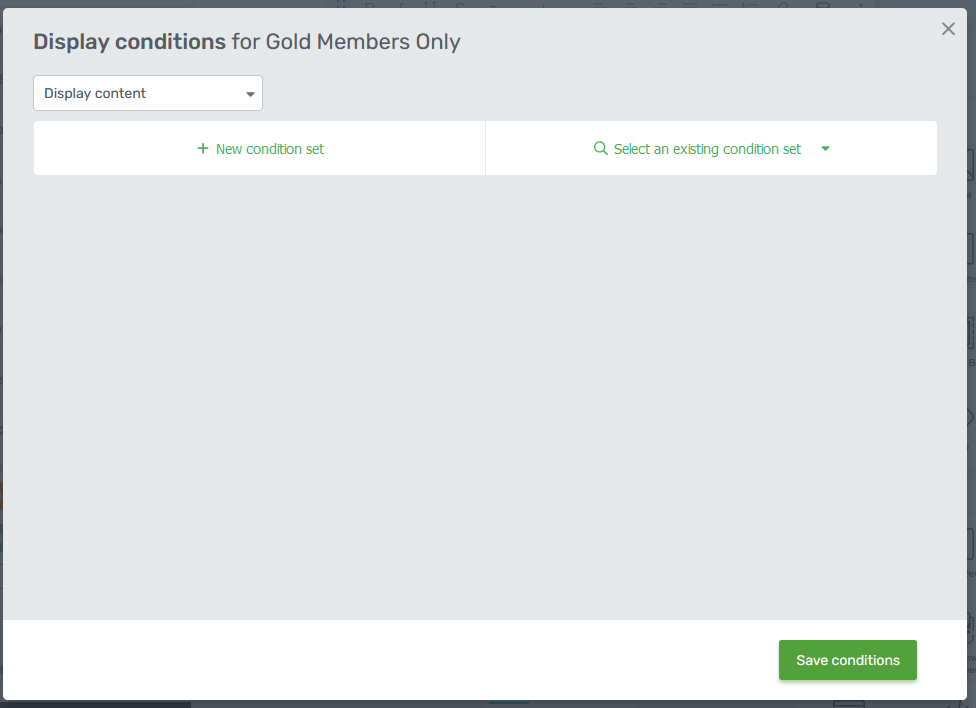
The “Display conditions for Gold Members Only” popup appears.
This allows us to create the conditions for the display of this element.
—
A dropdown with two options is available for the first selection.
Display content. This will display the content based on the condition set.
Hide content. This will hide the content based on the condition set.

—
In this example we are selecting Display content. Click the New condition set button to continue.
—
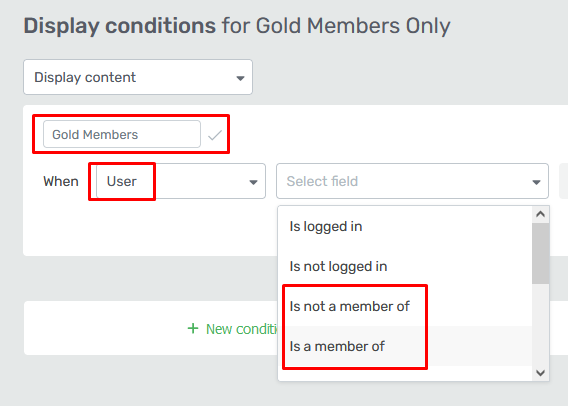
We can now edit the name of the rule. We have set the name to Gold Members in this example.
These are a few available options in the “When” dropdown but when setting a rule for member access, you will typically select User.
That allows you to select one of the WishList Member options from the “Select field” dropdown.
These are two choices:
Is not a member of. The content will be displayed if the user is not a member of the selected level(s).
Is a member of. The content will be displayed if the user is a member of the selected level(s).
—
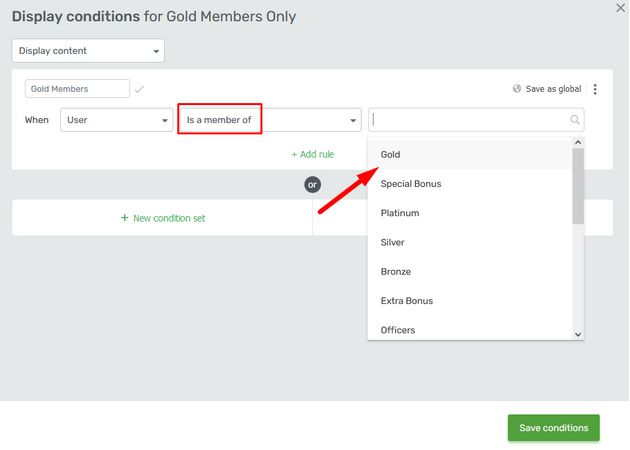
We have selected “Is a member of” and a search field appears. The Gold level can now be selected from the list of membership levels. More than one level could be selected if desired.
Note: The list of levels is being pulled from the Setup > Levels section in WishList Member.
—
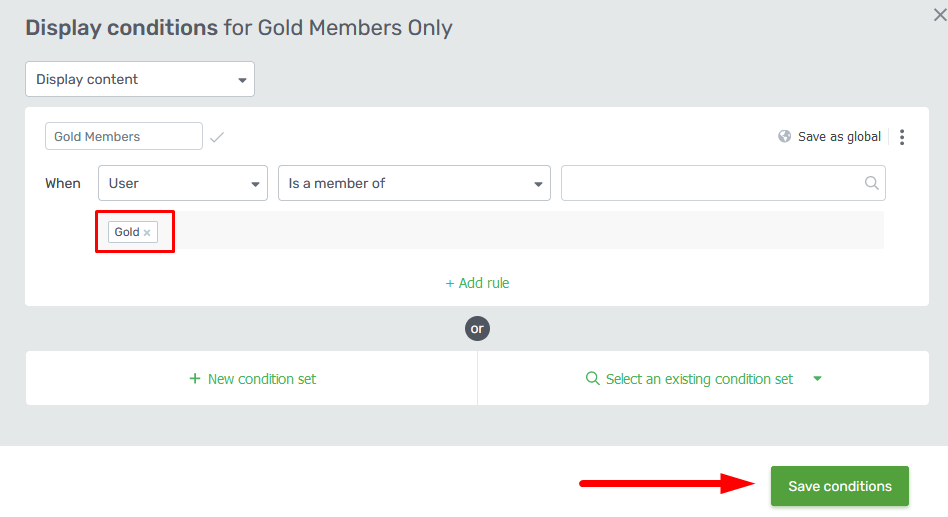
The selected level (Gold) now appears and the condition can be saved using the green Save Conditions button.
—
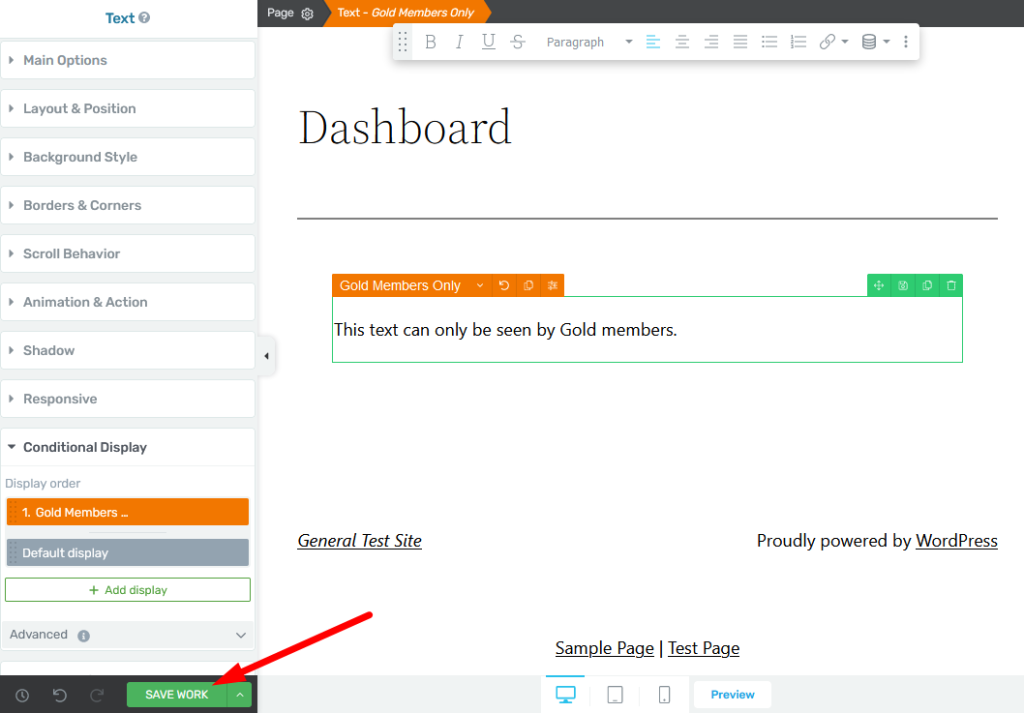
We are taken back to the Edit Page and the Conditional Display is all set. Click the Save Work button to complete the setup.
—
This means only members in the Gold level can view the “This text can only be seen by Gold members.” text while anyone else will see the default display stating “Click Here to join the GOLD level.”.
—
This method can be used to set up a wide variety of elements to be displayed or not displayed depending on membership levels. You can get creative and come up with scenarios that fit your site and benefit your community when using WishList Member and Thrive Architect.
—
More details on using WishList Member with Thrive Automator
More details on using WishList Member with Thrive Apprentice
